

Blog / Maintenance & Service, Expert Repairs & Diagnostics, Genuine Parts & Accessories, Engine Care &

What Causes Uneven Tire Wear on a Vehicle?

l

Uneven tire wear is primarily caused by incorrect wheel alignment, improper inflation pressures, worn suspension components, and unperformed tire rotations. Mechanical stress from bad ball joints or failing struts alters how tread blocks contact the road surface. Potholes, curb impacts, and heavy payload hauling also distort tire geometry, leading to accelerated wear that compromises braking distance and overall driving stability.

When a tire rolls along the pavement, its rubber contact patch should distribute the vehicle's weight uniformly across the entire tread width. If wheel alignment angles drift out of factory specification, the tire drags at an angle rather than rolling flat. This friction concentrated on a single edge or rib strips away rubber rapidly. Vehicle manufacturer specifications emphasize that even minor alignment deviations, such as a fraction of a degree off in toe or camber, will cause noticeable diagonal or shoulder wear over just a few thousand miles.

Tire pressure plays an equally vital role in tread longevity. Underinflated tires sag in the center, transferring weight outward and wearing down both outer shoulders prematurely. Overinflated tires balloon outward in the middle, causing rapid center tread loss while leaving the shoulders untouched. Routine maintenance, including checking inflation levels monthly with an accurate gauge, prevents these uneven wear profiles from forming.

Suspension wear and chassis impacts further compound tread breakdown. Driving over rough pavement or potholed back roads in Calcutta subjects steering linkages and control arms to severe shocks that can bend tie rods or knock alignment out of position. If you notice irregular tread patterns, pulling to one side, or steering wheel vibration, our team at 1503 Pennsylvania Ave, East Liverpool, OH 43920 can perform a comprehensive multi-point inspection. You can also give our service center a call directly at (330) 462-7578 or check current Ford service information before booking your visit.

Table of Contents

What Do Different Tire-Wear Patterns Reveal About Your Suspension and Alignment?

Visual tire-wear patterns serve as a precise diagnostic roadmap, signaling specific alignment errors, pressure issues, or worn mechanical components. Examining tread block shapes and wear location allows technicians to isolate problems before they destroy your tires.

Different mechanical failures generate distinct physical signatures on the tread surface. Understanding what these patterns mean helps drivers spot potential hazards early:

  • Center Tread Wear: Rapid wear concentrated strictly down the center rib indicates chronic overinflation. High pressure causes the center of the tire to bulge outward and carry the vast majority of the vehicle's load.
  • Shoulder Wear on Both Edges: Heavy wear on both the inner and outer edges with deeper tread remaining in the center signifies chronic underinflation. Lacking sufficient air pressure, the tire carcass collapses inward, forcing the outer shoulders to absorb road contact.
  • Inner or Outer Edge Wear: Heavy rubber loss on only one edge points directly to alignment trouble, specifically improper camber setting or incorrect toe angle. Excessive negative camber leans the top of the wheel inward, grinding down the inside shoulder.
  • Feathered Tread Edges: When individual tread blocks feel smooth when sliding your hand across them in one direction but rough and sharp in the opposite direction, the tire suffers from feathering. This condition is caused by incorrect toe alignment, which forces the tire to scrub sideways while rolling forward.
  • Tire Cupping or Scalloping: Deep, repeating scooped dips or valleys around the circumference of the tread indicate worn shock absorbers, struts, or loose wheel bearings. Worn dampeners fail to keep the tire firmly planted, allowing the wheel to bounce down the road like a basketball.

Ignoring irregular tread patterns causes secondary damage to wheel bearings, steering racks, and suspension bushings over time. Driving on cupped or feathered tires also increases stopping distances on wet pavement and reduces resistance to hydroplaning.

Catching these patterns early allows technicians to perform adjustments before the rubber is permanently ruined. When tread wear is identified in its beginning stages, correcting the mechanical root cause and rotating the tires can help balance out future wear. To have your tread inspected and corrected by factory-trained specialists, feel free to schedule a service appointment online or inquire about specialized equipment checks for custom vehicle factory orders.

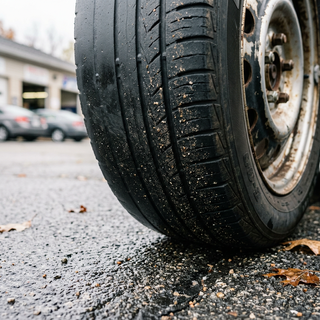
Close-up of a severely worn car tire with low tread depth resting on a wet asphalt road with fallen leaves. (Representative image for illustration purposes only. Actual vehicle may vary based on trim and configuration.)

How Do Bad Ball Joints, Shocks, and Suspension Parts Cause Inner Tire Wear?

Failing ball joints, worn control arm bushings, and leaking struts allow front wheels to lean inward, shifting the vehicle's weight onto the tire's inside shoulder. This misalignment creates excessive negative camber and improper toe angles, rapidly grinding down inner tread blocks until internal casing cords become exposed.

Ball joints act as the critical pivot points connecting your vehicle's control arms to the steering knuckles. As ball joints wear down internally, microscopic play develops within the socket. This looseness allows the wheel assembly to tilt outward or inward under load. When a lower ball joint deteriorates, the wheel splays outward at the bottom, creating an aggressive negative camber angle. This forces the inner edge of the tire to bear the brunt of vehicle weight and cornering friction.

Worn shock absorbers and struts exacerbate inner tire wear by failing to control wheel rebound. Struts hold the wheel at a precise angle relative to the body chassis. As internal hydraulic fluid leaks or valving degrades, the strut can no longer maintain structural rigidity during cornering or braking. The tire begins to wobble and bounce erratically, gouging out inner tread rubber while creating severe steering wheel vibrations.

Drivers frequently ask our technicians why inside shoulder wear often goes unnoticed until a tire fails. Because inner edge wear occurs on the hidden underside of the vehicle, a tire can look healthy from the outside while severely compromised on the inside edge. If rubber wears down to the internal steel belts or nylon body cords, the tire loses structural integrity and becomes a blowout risk. Correcting inner tire wear requires replacing degraded steering parts—such as ball joints, tie rod ends, or control arm bushings—and performing a four-wheel laser alignment to reset factory geometric tolerances. Our department can quickly supply genuine OEM Ford suspension parts built specifically for your model's exact chassis requirements.

How Many 32nds of an Inch Difference Is Allowed on AWD Tires?

Engineering guidelines for all-wheel-drive systems require all four tires to have matching tread depths within 2/32 of an inch to 3/32 of an inch of one another. Exceeding this variance forces the transfer case and center differential to work continuously to compensate for differing wheel rotation speeds, leading to severe mechanical overheating and premature drivetrain failure.

All-wheel-drive systems, such as Ford Intelligent AWD, monitor wheel speed sensors dozens of times per second to distribute torque precisely where traction is needed. Tire tread depth directly determines the overall rolling circumference of the wheel. A brand-new tire typically starts with 10/32 of an inch to 12/32 of an inch of tread depth, whereas a partially worn tire might measure 5/32 of an inch. This difference of 5/32 of an inch reduces the overall tire diameter by nearly a third of an inch, causing the worn tire to rotate faster than the new tire at identical vehicle speeds.

When tires on an AWD vehicle rotate at different speeds on dry pavement, the driveline computer interprets the speed differential as wheel slip. The system continuously engages clutch packs inside the center differential or power transfer unit to correct the non-existent slip. This constant binding generates extreme heat, degrades differential fluid, and can destroy expensive drivetrain components in a short period.

Tread Depth Variance Drivetrain Impact Recommended Action
0/32 to 2/32 of an inch Safe operational range; no driveline binding Maintain normal rotation schedule
3/32 of an inch Maximum allowable variance on most AWD systems Inspect tread regularly; plan replacement
4/32 of an inch or more High risk of transfer case and differential damage Replace all four tires or shave new tire

Commuters in Boardman who rely on all-wheel-drive traction during wet spring rains or icy winter storms must keep tread variance top of mind when replacing damaged tires. If a single tire suffers an unrepairable puncture, installing one brand-new tire alongside three worn tires can compromise the AWD transfer case. In these situations, replacing all four tires or sourcing a shaved replacement tire matches rolling circumferences safely. Drivers can check tire sizes and tread options using our online tire lookup tool.

How Often Should You Check Tire Pressure and Rotate Your Tires?

Drivers should inspect cold tire inflation pressure at least once a month and perform tire rotations every 5,000 miles to 7,500 miles or at every scheduled oil change. Maintaining this interval ensures uniform tread wear across front and rear axles, extending tire life and maintaining optimal fuel economy.

Tire air pressure fluctuates constantly due to ambient temperature changes and natural permeability through the tire's inner liner. For every 10-degree drop in outside air temperature, tire pressure decreases by approximately 1 PSI. Checking tire pressure monthly—and always before long highway trips—prevents undetected underinflation. Always measure pressure when the tires are cold, meaning the vehicle has been parked for at least three hours or driven less than one mile. The correct recommended inflation figure is located on the tire specification decal inside the driver's door jamb, not the maximum pressure stamped on the tire sidewall.

Tire rotation is critical because front and rear tires perform vastly different duties:

  1. Front Tires: Bear the weight of the engine, absorb front-wheel steering angles, and handle over 60 percent of all braking forces.
  2. Rear Tires: Primarily follow the front wheels in front-wheel-drive vehicles, experiencing straight-line rolling friction without steering stress.

By rotating tire positions periodically, wear patterns are distributed evenly across all four tires. Front-wheel-drive vehicles typically utilize a forward-cross rotation pattern, moving front tires straight to the rear and crossing rear tires to opposite front sides. Rear-wheel and four-wheel-drive trucks utilize a rear-cross pattern, moving rear tires straight forward and crossing front tires to opposite rear sides.

Individual tire rotations are an affordable maintenance service, and many tire manufacturers or service departments offer complimentary rotations over the life of the tires when purchased as a set. Combining rotations with your regular oil change keeps your maintenance schedule organized and ensures your tires wear down evenly over thousands of miles.

Common Questions About Diagnosing and Fixing Uneven Tire Wear

Q: Is it safe to drive with tires worn down on the inner edge?

No, driving with severe inner edge tire wear is unsafe because it structurally weakens the internal tire carcass. Excessive inner edge wear grinds away protective rubber layers, exposing internal steel belts and body cords to moisture, dirt, and road friction. Exposed cords quickly rust and fray, which dramatically increases the risk of a sudden highway blowout. If you spot exposed metal or fabric on any part of your tire tread, replace the tire immediately.

Q: Does tire rotation cost money or is it free with new tires?

Individual tire rotation services typically cost $20 to $50 when performed as a standalone service at a service center. However, many service departments and tire retailers offer lifetime complimentary tire rotations when you purchase a complete set of four new tires from them. Bundling your tire rotation with scheduled oil changes or multi-point vehicle inspections is a practical way to keep maintenance organized.

Q: What causes tire feathering and how is it corrected?

Tire feathering occurs when the individual tread blocks wear down at an angle, creating a sharp edge on one side and a rounded edge on the other. This condition is caused by improper toe alignment, which forces the tire to scrub sideways across the road while rolling forward. Feathering is corrected by placing the vehicle on an alignment rack and adjusting the steering tie rods back to factory toe settings.

Q: Why does cupping occur on rear tires of trucks and SUVs?

Cupping or scalloping on rear tires is caused by worn rear shock absorbers, out-of-balance wheel assemblies, or loose suspension bushings that allow the tire to bounce up and down repeatedly at highway speeds. Every time the tire bounces and lands on the pavement, rubber is carved out of the contact patch. Fixing rear tire cupping requires replacing worn shocks or struts and rebalancing the wheel assembly.

Q: Can misaligned tires lower fuel economy during daily driving?

Yes, misaligned tires increase rolling resistance, forcing your engine to work harder and consume more fuel. When wheels are not aligned parallel to each other, the misaligned tire drags across the pavement rather than rolling freely. This mechanical drag places continuous strain on the drivetrain, reducing fuel efficiency by up to 10 percent depending on how severely the alignment angles are off.

If you have additional questions about tire maintenance or need directions to our department, visit our dealership map and location page or speak with a service advisor directly at (330) 462-7578.

Protect Your Tires and Vehicle Stability at Tri State Ford

Catching uneven tire wear early saves money, protects your steering and suspension systems, and keeps your vehicle handling safely in all road conditions. Whether your vehicle needs a four-wheel alignment adjustment, new ball joints, routine tire rotations, or a fresh set of factory-approved tires, professional maintenance ensures long-term reliability.

Our certified technicians use specialized diagnostic tools and alignment equipment to restore your vehicle's factory specifications. Routine multi-point inspections catch worn control arm bushings, failing shocks, and pressure imbalances before they permanently ruin your tires.

Take the next step in caring for your vehicle today. Contact our service team to schedule a professional tire inspection and wheel alignment, ensuring your vehicle remains dependable for every commute and weekend journey ahead.
© 2026 Tri State Ford. All rights reserved.

Uneven Tire Wear Solutions in East Liverpool OH | Tri State Ford
Posted in:

Related Posts

f

Why Does Ford Technician Certification Matter for Vehicle Repairs?

Ford technician certification matters because modern Ford vehicles utilize complex network architectures, specialized computer module programming, and exact mechanical tolerances that require brand-specific technical expertise. A certified technician completes structured factory instruction to accurately diagnose electronic trouble codes, service high-voltage electric or EcoBoost powertrains, and execute manufacturer recall procedures without trial-and-error part replacement, protecting overall vehicle performance and supporting factory warranty coverage. Vehicles today function as mobile computer networks. A single Ford truck or SUV can contain up to 80 individual electronic control units communicating across high-speed controller area network (CAN-bus) lines. When an engine management light or safety system warning appears, standard multi-brand diagnostic code readers often display generic failure codes that miss underlying Ford-specific module errors. A technician who has completed manufacturer certification understands how these proprietary systems interact, allowing for precise fault isolation and correct repair procedures. Beyond digital diagnostics, mechanical standards on components such as twin-independent variable camshaft timing systems, 10-speed automatic transmissions, and integrated trailer brake controllers demand exact torque specifications and specialized assembly techniques. Factory-trained service specialists receive hands-on instruction using official shop manuals and specialized service tools engineered exclusively for Ford lineups. This specialized training reduces diagnostic time, prevents unnecessary component replacements, and ensures every repair restores the vehicle to original factory engineering standards. For complete ownership care and specialized diagnostics, local drivers can visit our service center on Pennsylvania Avenue to speak directly with our team. If you notice unusual drivability symptoms or require routine maintenance, give us a call at (330) 462-7578 or schedule a service appointment online at your convenience. Table of Contents What Specific Training and Requirements Define a Ford-Trained Technician? What Is Required to Achieve advanced Ford service training status? Why Are Factory Diagnostic Tools and Module Updates Essential for Modern Fords? Can a Mechanic Be Both ASE Certified and Ford Trained? Will Servicing a Ford at an Independent Shop Void the Factory Warranty? Common Questions About Ford Technical Training and Vehicle Service Schedule Factory-Trained Service at Tri State Ford What Specific Training and Requirements Define a Ford-Trained Technician? A Ford-trained technician is defined by completing structured educational tracks administered through Ford Motor Company, combining online technical modules, hands-on classroom instruction, and practical dealership experience. Candidates progress through technical career entry programs like STST (Service Technician Specialty Training) or college-level ASSET (Automotive Student Service Educational Training) courses to master Ford-specific electrical wiring, powertrain management, and chassis control systems. The path to factory credentialing involves multiple structured training tiers: STST Curriculum: Instructor-led classroom and web-based training modules focusing on specific vehicle systems, including engine repair, automatic transmissions, steering and suspension, climate control, and advanced electronics. ASSET Program: A two-year college program partnering higher education institutions with Ford dealerships, balancing classroom instruction with paid dealership co-op work experience. advanced Ford training: A streamlined pathway allowing experienced mechanics holding Automotive Service Excellence certifications to gain credit for general knowledge while completing Ford-specific technical coursework. introductory technical training: An introductory partnership connecting high schools and technical centers with Ford web-based training modules to build foundational knowledge. dealership apprenticeship: A formal dealership apprenticeship structure encompassing 18 to 24 months of training, incorporating about 2,000 hours of hands-on experience and roughly 400 hours of classroom learning across gas, hybrid, and electric vehicle systems. The daily commute across the rolling hills along State Route 170 in Calcutta subjects brake rotors, suspension bushings, and transmission clutches to continuous load shifts. Technicians trained directly by the manufacturer understand how these regional driving conditions accelerate wear on specific Ford components. Rather than relying on generic service guidelines, certified mechanics apply exact fluid specifications, updated software recalibrations, and genuine Motorcraft components tailored to maintain vehicle durability. To maintain vehicle performance without disrupting your daily routine, our team offers options like Ford Mobile Service for light maintenance at your home or workplace. For those performing their own routine maintenance, you can also order genuine OEM Ford parts directly through our service center. What Is Required to Achieve advanced Ford service training status? Achieving advanced Ford service training status requires a technician to earn and continuously maintain Master status across three core specialty tracks—chassis, powertrain, and electronics—for five consecutive calendar years. This credential represents the highest level of service expertise achievable within the Ford dealership network, demanding hundreds of hours of advanced coursework and regular practical examinations. To earn Master certification in each individual track, technicians must complete all foundational and advanced classroom labs, pass comprehensive written examinations, and demonstrate hands-on diagnostic proficiency. The requirements across the three core areas include: Powertrain Master Track: Mastery of engine overhaul procedures, turbocharger diagnostics, fuel-injection mapping, and multi-speed automatic transmission rebuilding. Chassis Master Track: Advanced certification in anti-lock braking systems, electronic stability controls, power steering calibrations, four-wheel-drive transfer cases, and air suspension systems. Electrical/Electronics Master Track: Comprehensive expertise in body control modules, multiplex wiring diagnostics, CAN-bus network troubleshooting, and Ford Co-Pilot360 driver-assist radar and camera alignments. Holding Senior Master status is not a one-time achievement. Vehicle technology evolves rapidly with new model years, introducing updated electrical architectures, high-voltage battery management systems, and over-the-air software capabilities. Senior Master technicians must complete annual update courses and recertification exams every year to retain their active status. Our service team observes that drivers coming in with intricate electrical or multi-system warnings benefit from having Senior Master technicians analyze the live data stream. When complex drivability issues arise, having top-tier technical expertise available ensures accurate fault identification on the first visit. For added maintenance convenience, owners can utilize Ford Pick-Up & Delivery to have their vehicle serviced by our trained staff without leaving home. Why Are Factory Diagnostic Tools and Module Updates Essential for Modern Fords? Factory diagnostic tools and software module updates are essential because contemporary Ford vehicles rely on complex computer software to operate engine management, safety sensors, transmission shift points, and cabin electronics. Specialized diagnostic hardware like the FDRS (Ford Diagnostic & Repair System) and IDS (Integrated Diagnostic Software) interfaces directly with factory servers to read proprietary diagnostic trouble codes and perform computer module reflash updates. General aftermarket scan tools used by non-affiliated repair facilities typically read only generic OBD-II emission codes. While an aftermarket tool might indicate a generic misfire, factory diagnostic software can isolate whether the issue stems from an injector driver signal, a variable camshaft solenoid fault, or a software calibration mismatch inside the powertrain control module. Computer module updates perform several critical functions on modern vehicles: Software Reflashing: Installing updated manufacturer code to fix drivability glitches, improve shift quality, or optimize fuel delivery without physical part replacement. Sensor Calibration: Aligning radar units, camera modules, and steering angle sensors following alignment or bumper service to ensure Ford Co-Pilot360 features function accurately. Guided Component Testing: Executing automated diagnostic sequences that test individual solenoids, relays, and actuators under precise operating conditions. Key and Module Initialization: Security handshake programming required when installing new engine computers, body control modules, or key fobs. Navigating the riverfront slopes in East Liverpool places sustained loads on vehicle transmissions and hill-descent systems. When software updates become available to refine clutch engagement or braking assist software under heavy loads, factory diagnostic equipment ensures those updates are applied correctly. Non-subscribed repair facilities without active access to Ford technical databases cannot reflash or update these proprietary vehicle computers. Can a Mechanic Be Both ASE Certified and Ford Trained? Automotive mechanics can hold both Automotive Service Excellence (ASE) certifications and official Ford factory training credentials simultaneously. Many professional dealership technicians carry active ASE certifications alongside their specialized manufacturer credentials to demonstrate both general automotive knowledge and brand-specific technical expertise. The National Institute for Automotive Service Excellence (ASE) evaluates a technician's understanding of general mechanical and electrical principles through standardized national examinations. ASE certifications cover universal system fundamentals across all vehicle makes and models, such as basic hydraulics, electrical testing theory, and mechanical steering geometry. In contrast, Ford factory training builds upon general mechanical skill by focusing exclusively on Ford engineering, component designs, and proprietary electronic systems. The table below outlines how these two professional credentials complement each other: Certification Type Governing Body Primary Focus Area Testing and Verification ASE Certification National Institute for Automotive Service Excellence Universal automotive repair principles, industry-standard diagnostics, and general mechanical theory across all vehicle brands. Standardized national written exams and verified two-year hands-on work experience requirement. Ford Factory Training Ford Motor Company Technical Career Entry System Brand-specific vehicle architectures, FDRS software reflash procedures, EcoBoost engine diagnostics, and Ford warranty standards. Proctored web modules, hands-on regional center training labs, and mandatory annual update testing. Ford's FAST (Ford Accepted Service Training) program specifically recognizes active ASE certifications, granting experienced mechanics course equivalency credits for general automotive fundamentals. This allows skilled mechanics to transition into specialized Ford training tracks faster, mastering model-specific software and diagnostic tools without repeating entry-level mechanical instruction. Will Servicing a Ford at an Independent Shop Void the Factory Warranty? Servicing a Ford vehicle at an independent repair shop does not void your factory warranty, provided routine maintenance is performed according to manufacturer guidelines and detailed service records are preserved. Under the federal Magnuson-Moss Warranty Act, automobile manufacturers cannot invalidate a vehicle's factory warranty simply because maintenance was completed by a non-dealership facility or using high-quality aftermarket parts. To protect your warranty coverage when using independent service facilities, vehicle owners must keep complete documentation for every maintenance procedure. Essential record-keeping practices include: Detailed Invoices: Retaining receipts that state the date, vehicle mileage, vin number, specific service performed, and exact part numbers installed. Correct Part Specifications: Ensuring non-OEM oil filters, air filters, and synthetic fluids meet the exact Ford material specifications listed in your owner's manual. Maintenance Schedule Adherence: Completing oil changes, tire rotations, spark plug replacements, and fluid flushes within the recommended mileage and time intervals. While routine maintenance like oil changes and tire rotations can legally be performed at independent shops, factory warranty repairs, safety recall campaigns, and complex software reflash procedures must be completed by an authorized Ford dealership. If an independent shop installs an incorrect component or damages a system during repair, any secondary damage caused by that improper service will not be covered under the factory warranty. Using authorized dealership service eliminates documentation friction during future warranty claims because every service record, factory software update, and genuine Motorcraft part installation is automatically logged directly into Ford's centralized vehicle history database. Common Questions About Ford Technical Training and Vehicle Service What specific training and requirements define a Ford-Trained Technician? Ford's technical training program includes comprehensive web modules, rigorous exams, and practical labs to ensure technician proficiency. Training paths like STST and ASSET cover brand-specific electrical networks, EcoBoost powertrains, and high-voltage systems. Can independent shops perform Ford software and computer module updates? Independent shops can only perform module updates if they maintain active subscriptions to Ford's proprietary FDRS or IDS software and possess compatible vehicle communication hardware. Non-subscribed independent shops cannot reflash or calibrate Ford computer modules. What is required to achieve advanced Ford service training status? Earning Senior Master status requires a technician to maintain Master credentials across chassis, powertrain, and electrical specialty tracks for five consecutive years. Technicians must also complete annual update courses on new model year technologies to keep their Senior Master credential active. Can a mechanic be both ASE certified and Ford trained? Mechanics frequently hold both credentials. ASE certification validates general automotive repair knowledge across all vehicle makes, while Ford factory training provides brand-specific expertise on Ford engineering, diagnostic software, and repair procedures. Will servicing a Ford at an independent shop void the factory warranty? Routine service at an independent shop does not void the factory warranty under federal law, provided maintenance meets manufacturer standards and receipts are kept. However, official warranty repair work and recall campaigns must be performed at an authorized dealership. For additional guidance on maintaining your vehicle's performance, view our routine battery testing and replacement guides online. If you need expert diagnostic support, you can reach our team directly at (330) 462-7578 or get step-by-step driving routes for finding our East Liverpool dealership. Schedule Factory-Trained Service at Tri State Ford Maintaining the safety, performance, and long-term value of your Ford requires specialized equipment and up-to-date technical training. From complex computer module reprogramming to routine brake and suspension care, relying on certified service professionals ensures every repair is executed according to exact manufacturer engineering standards. Contact our team today to schedule your next maintenance appointment and keep your vehicle running smoothly for years to come. © 2026 Tri State Ford. All rights reserved. Ford Technician Certification Benefits in East Liverpool OH | Tri State Ford

d

What Causes a Car to Make a Clicking Noise?

A vehicle clicking noise is primarily caused by low electrical current during startup, wear in rotating suspension or drivetrain components, or mechanical clearance issues inside the engine. A rapid click when turning the ignition key points to a weak battery or bad electrical connections, while rhythmic clicking during tight turns signals a failing constant velocity joint, and steady ticking from under the hood indicates valvetrain wear or low oil pressure. Understanding the specific conditions under which a noise occurs helps pinpoint the underlying issue before minor mechanical wear turns into an unexpected vehicle breakdown. Automotive clicking sounds generally fall into four distinct operational categories: Starting System Failures: Rapid or single clicking when attempting to crank the engine, tied to battery voltage drops, terminal corrosion, or starter motor degradation. Drivetrain and Steering Anomalies: Metallic clicking or popping that accelerates with vehicle speed, especially while turning, usually originating from damaged axle boots or worn joints. Engine Mechanical Ticking: Rhythmic ticking synced directly with engine speed (RPM), stemming from hydraulic valve lifters, low oil pressure, or high-pressure fuel injectors. Brake and Wheel Assembly Issues: Clicking heard during low-speed braking or coasting, caused by loose brake pad retaining clips, shifting pads, or debris behind the dust shield. East Liverpool's riverfront bluffs and steep grade changes put consistent mechanical strain on constant velocity joints and steering components, making drivetrain clicks easy to identify during daily driving. When an unfamiliar noise develops, getting a professional system check ensures your vehicle remains reliable and safe. You can drop by our East Liverpool service center at 1503 Pennsylvania Ave or give our team a quick call at (330) 462-7578 to speak directly with an expert diagnostic technician. Table of Contents Why Does a Car Make a Rapid Clicking Noise When Starting? How Do You Tell If a Clicking Start Is Battery or Starter Related? What Is the Difference Between Clicking When Turning and Engine Ticking? Is It Cheaper to Replace Just a CV Boot or the Entire CV Axle? Common Diagnostic Questions About Vehicle Clicking Noises Schedule Professional Vehicle Diagnostic Service Why Does a Car Make a Rapid Clicking Noise When Starting? A rapid clicking sound during vehicle startup occurs when the starter solenoid rapidly engages and disengages because it lacks sufficient electrical amperage from the battery. This rapid cycling happens when battery voltage drops below the required operating threshold, cable terminals suffer from corrosion, or an alternator failure prevents the battery from maintaining its electrical charge reserve. When you turn the ignition key or press the start button, the vehicle electrical system sends power to the starter solenoid coil. The solenoid requires a continuous flow of high amperage to hold the starter energizing plunger in place against its internal return spring. If electrical resistance is high or battery charge is depleted, the electrical circuit energizes the solenoid briefly, but the immediate voltage drop forces the spring to push the plunger back. This continuous cycle of rapid engagement and release creates the fast, machine-gun clicking sound under the hood. Common root causes for rapid starting clicks include: Undersized or depleted battery voltage resulting from age or cold weather capacity loss. Heavy buildup of lead sulfate or corrosion on positive and negative battery terminals. Loose or frayed ground straps between the engine block and chassis. Internal diode failure inside the charging system that leaves the battery undercharged during regular driving. Drivers frequently ask our service advisors whether a rapid click automatically means the starter motor is destroyed, when in reality a simple electrical system test resolves the issue nearly nine times out of ten. Replacing compromised cables or installing genuine Ford battery and electrical parts online restores full cranking power and protects your starter motor from premature wear. How Do You Tell If a Clicking Start Is Battery or Starter Related? To determine if a clicking start stems from the battery or the starter motor, observe cabin lighting behavior and the rhythm of the click during ignition. A rapid multi-click accompanied by dimming interior lights or flickering digital displays points to a depleted battery or poor terminal connection, whereas a single loud click with full dashboard brightness indicates a failed starter solenoid or jammed starter motor. Diagnosing the difference between electrical power loss and starter hardware failure requires checking how the vehicle responds under electrical load. Turn on the vehicle headlights and attempt to crank the engine: Battery or Connection Issues: Headlights will dim significantly or shut off entirely when key engagement occurs. The starting sound presents as a fast series of light clicks. Voltage drop testing across the battery posts usually reveals output under 10.5 volts during load. Starter Motor Issues: Headlights remain strong and clear without flickering. The starting sound presents as a single heavy metallic knock or click as the starter solenoid attempts to engage a worn starter armature or damaged flywheel ring gear. If a weak battery is suspected, jump-starting the vehicle offers immediate diagnostic feedback. Attach positive jumper cables to positive terminals on both vehicles, then clamp the negative cable to an unpainted metal ground on the vehicle needing assistance. Allow the donor vehicle to run for several minutes to transfer surface charge. If the vehicle starts right up after charging, the starter motor is functioning properly, and attention should turn to routine battery maintenance and voltage diagnostics to determine if the battery or charging system needs replacement. What Is the Difference Between Clicking When Turning and Engine Ticking? The core difference between turning clicks and engine ticks lies in what triggers the sound and how its rhythm responds to vehicle movement. Clicking while turning originates in the drivetrain—specifically worn constant velocity joints—and speeds up with wheel rotation, whereas engine ticking stems from internal valvetrain components or fuel injectors and speeds up directly with engine RPM, even while the vehicle is sitting in park. Suburban commuters navigating State Route 170 through Calcutta often spot constant velocity joint clicking when turning sharply into shopping center parking lots under acceleration. Dissecting the characteristics of each noise helps isolate the mechanical system involved: Drivetrain Clicking Characteristics Noise correlates directly with vehicle ground speed, not engine engine revs. Sound intensifies during hard cornering or low-speed turning maneuvers. Caused by worn outer ball bearings inside a constant velocity joint after protective rubber boots split and lose lubrication. Pitch remains steady, but frequency increases as wheel rotation speeds up. Engine Ticking Characteristics Noise correlates directly with engine engine revs (RPM) and remains audible while idling in neutral or park. Sound originates beneath the valve covers or near the intake manifold. Caused by mechanical clearance in hydraulic valve lifters, low engine oil pressure, worn rocker arms, or normal operation of high-pressure direct fuel injectors. Adding engine oil can quiet valvetrain ticking if the oil dipstick shows low fluid levels, as proper oil volume restores hydraulic pressure inside the lifters. Brake hardware can also create localized clicking. Loose brake pad retaining clips allow pads to shift inside calipers when changing direction from drive to reverse, producing a single metallic click that should be inspected during regular service. Is It Cheaper to Replace Just a CV Boot or the Entire CV Axle? Replacing an entire constant velocity axle assembly is generally more cost-effective and reliable than replacing only a torn boot once clicking has begun. While a rubber boot replacement kit costs less in standalone parts, installing it requires identical labor steps to remove the axle shaft, and an actively clicking joint has already suffered permanent metallic damage from lost grease and road debris. When a flexible rubber boot cracks, grease flings outward onto suspension parts while dirt and water enter the bearing housing. This contamination rapidly abrades internal steel bearings and raceways. Comparing the service options highlights why complete replacement is standard practice: Repair Consideration Boot Replacement Only Complete CV Axle Assembly Initial Parts Cost Lower initial cost for rubber boot kit Moderate cost for complete factory axle shaft Labor Hours Required High (requires full disassembly and cleaning) Moderate (direct bolt-in replacement) Fixes Active Clicking? No (cannot repair internal metal wear) Yes (replaces all joint bearings entirely) Long-Term Reliability Risk of premature joint failure remains Full factory component life restored Attempting to save on parts by installing a boot over an already noisy joint leaves damaged bearings inside the drivetrain. Continued driving on a severely worn joint risks complete axle separation, which causes an immediate loss of power to the drive wheels and potential damage to nearby suspension steering arms. To protect your vehicle, you can schedule a service appointment online to have our technicians inspect your drive axles. Common Diagnostic Questions About Vehicle Clicking Noises Q: Can a failing alternator cause a car to click when starting? A damaged alternator fails to recharge the battery while the engine runs, steadily draining reserve battery capacity. Once electrical storage drops below necessary amperage, attempting to turn the ignition key results in a rapid clicking sound as the starter solenoid repeatedly cycles without sufficient power to turn the engine over. Q: Will adding engine oil stop a valve lifter ticking noise? Adding engine oil stops valvetrain ticking only if the noise is caused by low oil level or low oil pressure. Topping off engine oil restores hydraulic pressure to the lifters, but if the noise stems from mechanical wear, internal varnish, or sludge buildup, physical component replacement is necessary. Q: How do you jump-start a car that makes a rapid clicking noise? Connect positive jumper cables to positive battery terminals on both vehicles, then clamp the negative cable to an unpainted metal ground on the engine block of the vehicle with the dead battery. Allow the donor vehicle engine to run for several minutes to transfer charge before attempting to turn the ignition key. Q: Is it safe to drive a vehicle with a noisy CV joint? Driving with an actively clicking constant velocity joint is unsafe because internal bearing failure can cause the drive axle shaft to detach from the wheel hub assembly. Complete joint failure leads to immediate loss of vehicle drive power and potential steering control issues. Q: Why does my vehicle make a clicking sound after turning off the engine? Clicking or pinging sounds immediately after engine shutoff are caused by hot metal components contracting as they cool down. The exhaust manifold, catalytic converter, and heat shields expand under operating heat and emit light metallic clicks as ambient air cools the exhaust system. Schedule Professional Vehicle Diagnostic Service Resolving a vehicle clicking noise quickly prevents minor electrical drain or suspension joint wear from turning into unexpected roadside breakdowns. Our factory-trained service department provides complete battery load testing, drivetrain inspections, and engine diagnostics using specialized OEM equipment to pinpoint exact mechanical causes. Vehicle owners backed by Ford factory protection enjoy standard roadside assistance benefits, including emergency jump-starts and towing support to authorized service facilities. If you encounter an unexpected battery failure on the road, contact Ford Roadside Assistance: 1-800-241-3673 for quick dispatch support. Our service center provides comprehensive care tailored to your daily schedule: Factory-certified technicians using original equipment parts. Advanced diagnostic computers that analyze electrical systems and engine sensors. Comfortable customer lounge area with complimentary connectivity. Convenient online booking and transparent repair estimates. Whether you need a quick battery swap, axle replacement, or local maintenance assistance through our convenient Ford Mobile Service options, our team is ready to help. Visit our dealership address at 1503 Pennsylvania Ave, East Liverpool, OH 43920 or call our service desk directly at (330) 462-7578 to reserve your diagnostic appointment today. © 2026 Tri State Ford. All rights reserved. Car Clicking Noise Diagnostics in East Liverpool OH | Tri State Ford

d

How Do You Troubleshoot a Car That Won't Start?

Troubleshooting a car that will not start begins by testing headlights and cabin electronics to observe power levels, listening closely to engine response when turning the key, and inspecting terminal connections for corrosion. If interior accessories stay completely dark or rapid clicking occurs, a discharged battery or loose terminal connection is usually at fault. A single sharp metallic clunk points toward a failed starter, whereas dimming headlights while driving signals an alternator issue. When an engine refuses to crank, performing a quick visual and operational check narrows down the root cause before calling for service. Turn the ignition key to the run position without starting the engine to evaluate key electrical systems: Headlights and Dome Lights: Bright lights indicate adequate resting voltage, shifting suspicion toward the starter motor or ignition switch. Weak or flickering lights point directly to a depleted battery or poor terminal ground. Battery Terminals: Inspect cable clamps for white or greenish crusty oxidation. Loose or corroded terminals block current flow even if internal cell chemistry remains healthy. Jump-Start Response: Connecting jumper cables or a portable booster pack delivers immediate diagnostic feedback. If the engine fires up right away and stays running, the battery was simply drained. If the engine stalls the moment jumper cables are disconnected, the charging system is not producing working voltage. Cold mornings along State Route 170 in Calcutta place extra strain on an electrical system during early starts, quickly exposing marginal batteries before total failure occurs. Drivers dealing with a vehicle that leaves them stranded can contact our location on Pennsylvania Avenue for fast diagnostic support or give our service desk a quick call at (330) 462-7578 to arrange towing and vehicle evaluation. Table of Contents How Can You Tell If the Battery, Starter, or Alternator Is Failing? What Distinct Sounds Do a Bad Battery, Failing Starter, and Faulty Alternator Make? What Multimeter Readings Indicate a Bad Battery Versus a Bad Alternator? Can a Bad Alternator Ruin a Brand-New Car Battery? What Tools Are Needed to Replace an Alternator at Home and How Long Does It Take? What Questions Do Drivers Ask Most About Electrical System Failures? How Can You Tell If the Battery, Starter, or Alternator Is Failing? Distinguishing between a failing battery, a worn starter, and a faulty alternator comes down to identifying when electrical symptoms occur during vehicle operation. Battery issues manifest primarily during ignition attempts, starter failures prevent the crankshaft from turning despite full accessory power, and alternator problems appear while the engine is already running. Each component plays a specialized role in keeping your vehicle running smoothly. The battery stores chemical energy to initiate engine cranking. Once the engine starts, the alternator takes over to supply power to all onboard electronics while replenishing electrical reserves. The starter motor draws high amperage from the battery to physically turn the flywheel and start engine combustion. Recognizing specific warning signs prevents unexpected breakdowns and unnecessary part replacements: Failing Battery Symptoms: Slow, laboring engine cranking, radio or power window slowdown before ignition, a swollen battery case, or an engine that requires boosting after sitting overnight. Failing Starter Symptoms: Dash lights and radio operate normally, but turning the key produces total silence or a single heavy metallic knock. The engine fails to turn over despite a verified full battery charge. Faulty Alternator Symptoms: A illuminated red battery warning icon on the dashboard, headlights that dim or brighten as engine speed changes, burning rubber smells from a slipping belt, or vehicle stalling while driving down the highway. Our service team routinely observes that drivers who experience sudden vehicle stalling while driving are dealing with an depleted charging system rather than an isolated battery failure. Staying current on routine battery maintenance and testing helps identify deteriorating cell strength before winter weather arrives. Drivers noticing early warning signs can easily protect their daily schedule by scheduling a service appointment online for a complete electrical system checkup. What Distinct Sounds Do a Bad Battery, Failing Starter, and Faulty Alternator Make? Audible signals provide immediate clues about which electrical component is deteriorating under the hood. A weak battery makes a rapid, repetitive clicking sound or a slow, low-pitched engine groan during cranking attempts. A damaged starter motor generates a single loud metallic thud, a harsh grinding noise, or a high-pitched whirring sound without engaging the engine. A failing alternator produces a high-pitched whining or growling noise caused by worn internal bearings or a slipping belt drive. Understanding acoustic symptoms helps isolate electrical-mechanical wear before total component breakdown: Electrical Component Primary Acoustic Symptom Secondary Operational Sound Underlying Mechanical Cause Vehicle Battery Rapid chatter or light clicking Slow, struggling engine turnover Starter solenoid rapid cycling due to insufficient voltage Starter Motor Single heavy metallic thud High-pitched spinning screech Pinion gear failing to mesh properly with engine flywheel ring gear Alternator Unit High-pitched mechanical whine Harsh growling or squealing belt Deteriorated internal bearings or improper drive belt tension Frequent short stop-and-go driving along Market Street in Boardman prevents the alternator from fully recharging the battery, making routine acoustic checks even more vital for local vehicle owners. When unusual underhood noises arise, keeping vital chassis and drivetrain components in top condition is essential. Drivers setting up seasonal maintenance can conveniently order replacement items by finding exact-fit tires online to ensure maximum traction, or by ordering genuine Ford replacement parts directly through our factory-certified parts department. What Multimeter Readings Indicate a Bad Battery Versus a Bad Alternator? A resting battery voltage reading below 12.2 volts indicates a depleted or worn battery cell structure, whereas a reading between 13.5 and 14.7 volts with the engine running confirms a fully functional alternator. Testing electrical potential with a digital multimeter provides exact numbers that separate simple battery drain from internal generator failure. Executing a structured voltage check requires taking measurements under specific operational states: Resting State Test: Set the multimeter to DC voltage and connect the probes to the battery terminals with the engine and all electrical accessories turned off. A healthy lead-acid or Motorcraft AGM battery shows between 12.6 and 12.8 volts. A reading between 12.2 and 12.4 volts reflects a 50 percent charge level, while anything under 12.0 volts indicates a deeply discharged state requiring immediate charging and conductance testing. Cranking Voltage Drop Test: Monitor the meter display while an assistant cranks the ignition. Healthy starting systems maintain voltage above 9.6 volts during the three-second start cycle. If voltage drops below 9.0 volts while the engine turns slowly, internal battery plate sulfation or cell breakdown has occurred. Charging Output Test: Start the engine and measure voltage across the terminals at idle speed. A functional alternator raises voltage to between 13.5 and 14.7 volts to recharge the battery while powering ignition coils and accessories. Load Test Verification: Turn on the high-beam headlights, cabin heater fan, and rear defroster while the engine idles. If alternator output drops below 13.0 volts under high electrical load, the voltage regulator or internal diodes are failing. Can a Bad Alternator Ruin a Brand-New Car Battery? A faulty alternator can permanently destroy a brand-new car battery by either undercharging it into deep chemical exhaustion or overcharging it until internal electrolyte fluid boils off. Installing a fresh battery without verifying alternator output often leads to premature battery failure within days or weeks. Undercharging occurs when internal alternator diodes fail or stator windings degrade, causing generator output to drop below operating thresholds. When this happens, the vehicle relies entirely on stored battery reserve to run engine control modules, fuel pumps, and cabin electronics. Deeply discharging a starting battery below 10.5 volts causes lead sulfate crystals to harden on internal grid plates. This process reduces cold-cranking capacity permanently. Overcharging represents an equally destructive condition caused by a failed internal voltage regulator. When a regulator breaks down, the alternator can pump over 15.0 volts continuously into the electrical system. Excessive voltage creates intense internal heat, causing electrolyte water to evaporate into hydrogen gas. Overheated plates warp, shorting internal cells and swelling the exterior casing. Whenever replacing an aged battery, having factory-certified technicians verify total charging system voltage ensures your financial investment remains protected under full manufacturer warranty terms. What Tools Are Needed to Replace an Alternator at Home and How Long Does It Take? Replacing an alternator at home requires a standard metric socket set, open-end combination wrenches, a serpentine belt tensioner tool or breaker bar, safety glasses, and a digital multimeter for post-installation verification. Completing an alternator replacement typically takes between one and three hours of labor depending on engine bay clearance and bracket accessibility. Carrying out a successful DIY alternator replacement involves organizing essential tools and following systematic safety steps: Hand Tools and Hardware: Metric socket set with 3/8-inch drive ratchet, socket extensions, combination wrenches ranging from 8mm to 15mm, and a torque wrench for accurate bolt securing. Belt Removal Equipment: A dedicated serpentine belt tensioner tool or long-handled breaker bar to rotate the spring-loaded belt tensioner pulley and release belt drive tension safely. Safety Equipment: Heavy-duty work gloves and safety glasses to shield eyes from debris and prevent pinch injury around drive pulleys. Diagnostic Meter: Digital multimeter to verify battery disconnected state prior to work and confirm active output upon completion. Before beginning mechanical disassembly, always disconnect the negative battery terminal to prevent accidental short circuits or electrical arcing when removing the main alternator B+ output cable. Label wire connections and note serpentine belt routing across pulleys before releasing tension. Vehicles equipped with compact transverse engine layouts may require removing intake ducting or cooling fans, extending total repair time up to three hours. What Questions Do Drivers Ask Most About Electrical System Failures? Q: What happens if I jump-start a car with a completely broken alternator? A vehicle with a broken alternator may start using power supplied by jumper cables, but the engine will stall shortly after the cables are disconnected. Without a working generator to produce current, ignition coils and fuel injectors consume remaining battery reserves within minutes. Operating a vehicle solely on battery power can cause unpredictable electrical shutdowns while driving. Q: How can I tell if my starter solenoid has failed rather than the starter motor itself? A failing starter solenoid produces a rapid chattering noise or a single loud click when turning the key, without cranking the engine flywheel. In some cases, accessory lights remain bright while the starter motor receives zero electrical current. Testing for battery voltage at the solenoid control terminal during key engagement pinpoints whether the solenoid switch or starter motor brushes have failed. Q: Can extreme winter weather cause a healthy battery to fail without warning? Cold temperatures slow internal chemical reactions within battery cells, reducing available cold-cranking power while engine oil thickens and requires more force to turn over. A battery operating at partial capacity in warm weather can fail to start an engine when ambient temperatures drop below freezing. Annual battery testing prior to winter months identifies weak cells before failure occurs. Q: How long can a car run on battery power if the alternator belt snaps? A modern vehicle running strictly on battery power typically operates for 15 to 30 minutes before system voltage drops too low to fire spark plugs or run fuel pumps. Turning off headlights, heating fans, seat warmers, and audio displays conserves remaining voltage, giving drivers critical minutes to safely navigate off busy roadways. Q: Does my Ford warranty cover roadside towing for sudden battery or alternator breakdown? Vehicles covered under Ford factory warranty benefit from comprehensive roadside coverage that includes emergency battery jump-starts and towing support to authorized service centers. Drivers experiencing unexpected roadside electrical failure can contact Ford Roadside Assistance at 1-800-241-3673 for immediate dispatch and prompt towing coordination. Protecting your vehicle's starting and charging systems requires prompt diagnostic action at the first sign of slow cranking, dimming lights, or abnormal underhood noise. Drivers looking for complete service peace of mind can get straightforward driving steps to our location on Pennsylvania Avenue or reach our factory-trained service technicians directly by calling our service counter at (330) 462-7578 to book a professional electrical system inspection today. © 2026 Tri State Ford. All rights reserved. Car Won't Start Troubleshooting in East Liverpool OH | Tri State Ford