

Blog / Maintenance & Service, Expert Repairs & Diagnostics, Genuine Parts & Accessories, Engine Care &

Why Does a Car Make a Clicking Noise When Turning?

5

A car makes a rhythmic clicking noise when turning primarily because of a worn outer constant velocity joint on a front-wheel-drive or all-wheel-drive drive axle. When the joint's protective rubber boot tears or cracks, synthetic grease escapes and dirt enters, causing the internal steel bearings and cage to wear and snap repeatedly against their channels on every rotation during tight turns under load.

A repeating click that speeds up as road speed increases is one of the most recognizable drivability symptoms in modern vehicles. On front-wheel-drive models and all-wheel-drive crossovers like the 2026 Ford Escape AWD, the outer constant velocity joint undergoes significant pivoting to transfer engine torque while accommodating steering angles. As bearing clearances expand from mechanical wear, every full turn shifts torque across pitted metal surfaces, creating a distinct popping or clicking sound.

Identifying whether the sound occurs during slow maneuvers or higher-speed cornering helps narrow down the mechanical source before scheduling a professional vehicle evaluation. If you suspect an issue with your vehicle's front axle or steering, our team at Tri State Ford can inspect your suspension and driveline at 1503 Pennsylvania Ave, or you can give us a quick call to discuss what you are hearing on the road.
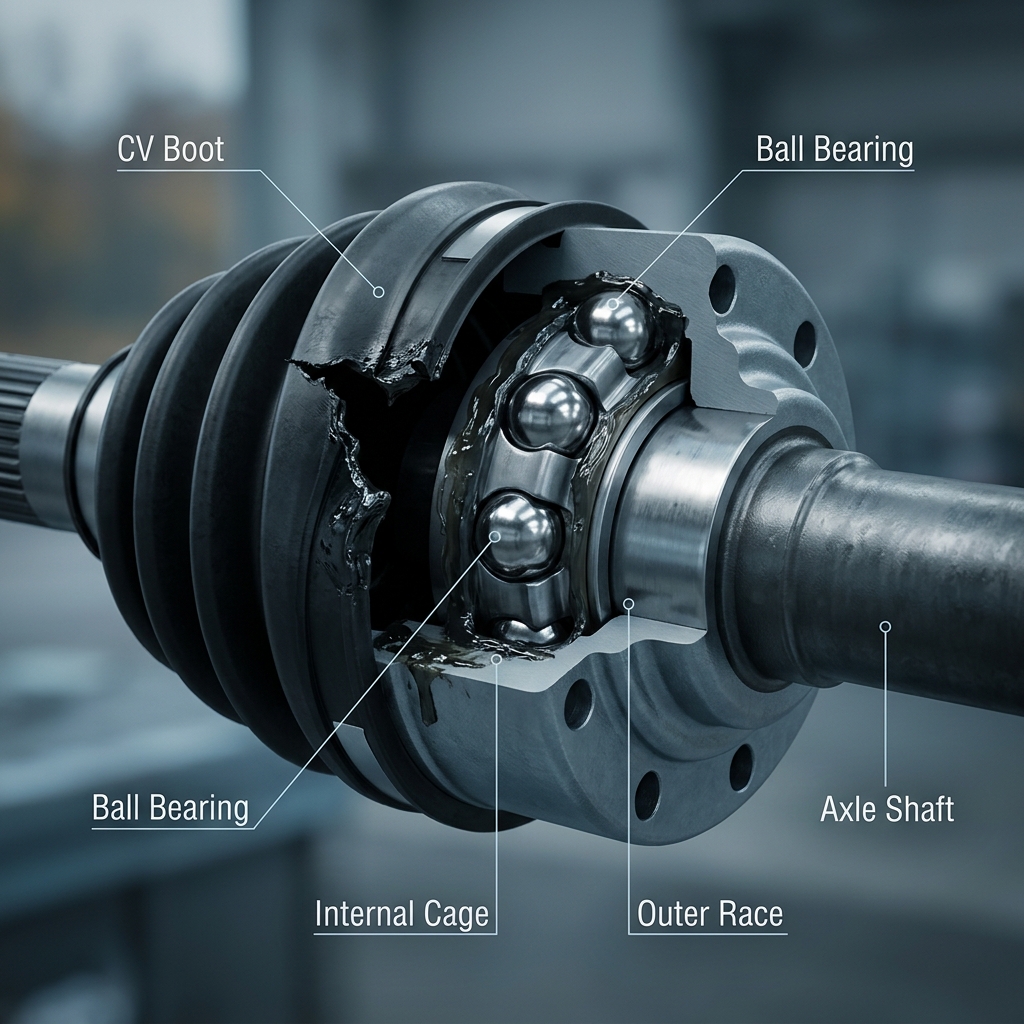
 Cutaway diagram of a damaged constant-velocity CV joint showing ball bearings, internal cage, outer race, and torn boot. (Representative image for illustration purposes only. Actual vehicle may vary based on trim and configuration.)

Table of Contents

How Do Constant Velocity Joints Work and Why Do They Click?

Constant velocity joints transfer smooth rotational power from the transmission and differential to the drive wheels at a continuous speed while allowing the front wheels to steer and absorb vertical suspension movement. They click when damaged bearing balls or worn housing tracks snap against each other under angular stress during turns.

Every drive axle features two distinct joint designs that work together:

  • Outer CV joint: Positioned adjacent to the wheel hub, this component accommodates steering angles up to 45 degrees while continuing to turn the wheel smoothly.
  • Inner CV joint: Positioned near the transaxle or differential, this component flexes up and down to follow vertical suspension travel over bumps and uneven pavement.
  • Flexible rubber boot: An accordioned neoprene or silicone cover clamped tightly over each joint to seal in high-temperature grease and seal out moisture, sand, and road grit.

Because outer joints endure both rotational force and sharp steering angles, they experience greater lateral stress than inner joints. When a rubber boot degrades or suffers road debris damage, grease flings outward onto nearby suspension parts. Starved of lubrication, internal steel ball bearings grind against their hardened cage. During turns, the severe angle forces these misaligned bearings into worn pockets, producing a rhythmic clicking or snapping sound that gets louder as throttle is applied. Driveline components on capable 4x4 models, such as the 2026 Ford Bronco Sport 4x4 equipped with its SelectShift® transmission and 2L engine, rely on pristine CV axle boots to maintain smooth torque delivery across rugged terrain and daily commutes alike.

Commuters navigating gently rolling terrain and State Route 170 around Calcutta often notice this symptom first during tight low-speed turns, such as turning into a driveway or making a U-turn. Heavier vehicles and commercial setups, including our F-Series work truck options, rely on robust front driveline assemblies that demand routine inspection during scheduled maintenance intervals to ensure long-term durability.

What Is the Mechanical Cause of Turning Clicks and Typical CV Axle Repair Costs?

The primary mechanical cause of a turning click is an outer CV joint with worn internal ball bearings, with professional CV axle replacement contact us for current pricing depending on vehicle drivetrain design and labor complexity.

When diagnosing turning noises, the precise failure mechanism dictates the necessary repair path:

  1. Split boot without joint noise: If a split flexible boot is discovered early before contamination or noise occurs, replacing just the boot assembly typically costs between $180 and $450.
  2. Worn joint with active clicking: Once rhythmic snapping or clicking is present, internal metal scoring has already occurred. Installing a complete original equipment or remanufactured CV axle assembly usually costs $250 to $650 per side for standard front-wheel-drive passenger cars, while specialized all-wheel-drive or heavy-duty trucks can reach $700 or more due to additional labor.
  3. Secondary hub or suspension labor: If corrosion or seized hardware requires extra shop time, overall repair expenses increase accordingly.

Drivers who bring a vehicle in with a turning noise often ask if replacing just the boot will fix it, but technicians recommend replacing the entire axle assembly once clicking starts because internal metal scoring cannot be undone by fresh grease alone. Installing a factory-spec complete axle assembly ensures proper shaft balance, correct splines, and factory-torqued axle nuts. Vehicle owners performing maintenance or working with trusted technicians can order genuine Ford parts online directly through our facility to ensure factory fitment and durability.

Can Bad Wheel Bearings, Ball Joints, or Brake Calipers Cause Turning Clicks?

Bad wheel bearings, worn ball joints, and sticking brake calipers can all cause noise while turning, but each produces a distinct sound and vibration profile rather than the sharp, rhythmic clicking of a failing outer CV joint.

Differentiating among front-end component noises requires paying close attention to pitch, rhythm, and driving conditions:

  • Wheel bearing: A failing wheel bearing produces a low-frequency hum, growl, or drone that grows louder with vehicle speed. The sound changes tone when vehicle weight shifts from side to side during high-speed cornering, rather than producing a sharp metallic click during low-speed turns. In extreme failure stages, a disintegrating bearing can clunk as load shifts across the hub.
  • Ball joint and tie-rod end: A worn ball joint or loose tie-rod end creates a deep creaking, popping, or heavy clunk when turning the steering wheel or driving over bumps. This noise stems from mechanical play in the suspension pivot points rather than rotational speed.
  • Brake dust shield and hardware: A bent metal dust shield or loose brake pad retainer clip can scrape or tick against the brake rotor. This noise often changes when applying the brakes and occurs even when rolling straight.
  • Sway-bar link and strut mount: Worn sway-bar link bushings or binding upper strut mount bearings snap or knock once as the body rolls during a turn, rather than producing a continuous, speed-dependent click.

Drivers experiencing frequent stop-and-go driving along commercial corridors like Market Street in Boardman subject their front steering and suspension joints to thousands of movement cycles daily. Inspecting these components together during routine service isolates the exact source of any front-end noise.
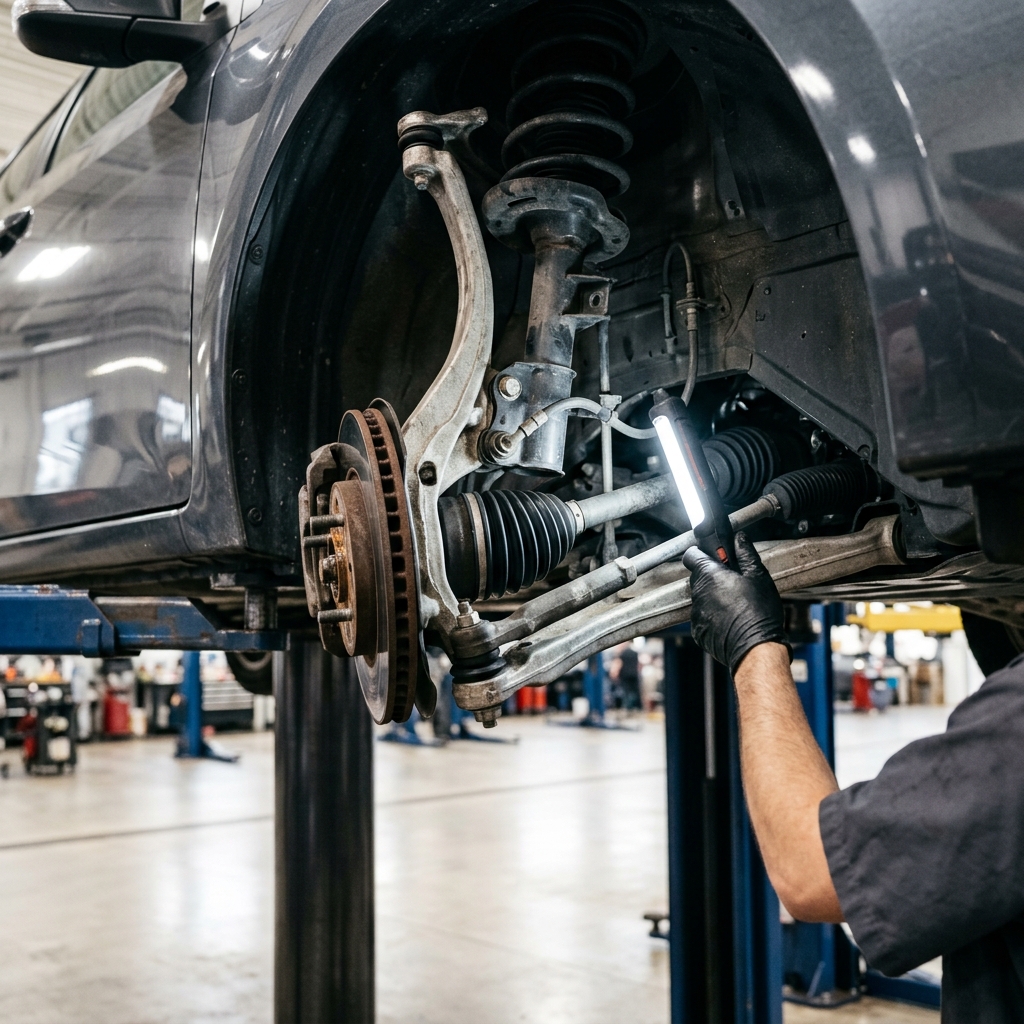
Mechanic using a work light to inspect the front suspension and brake assembly of a car raised on a lift. (Representative image for illustration purposes only. Actual vehicle may vary based on trim and configuration.)

How Far Can You Drive on a Clicking CV Axle and How Do You Identify Which Side Is Failing?

A vehicle can sometimes be driven a few hundred miles after initial CV axle clicking begins, but continued driving risks complete axle fracture, loss of motive power, and secondary damage to the wheel hub or transmission.

Identifying which side has failed requires a simple road test in an empty parking lot:

  • Right-turn load test: Turn the steering wheel sharply to the right while accelerating gently in a slow circle. If clicking intensifies, the driver-side (left) outer joint is under heavy load and is likely failing.
  • Left-turn load test: Turn the steering wheel sharply to the left under light throttle. Increased clicking points toward a failing passenger-side (right) outer joint.
  • Visual boot check: Inspect behind both front wheels with a flashlight. Fresh grease splattered across the inner wheel barrel, brake caliper, or lower control arm clearly identifies a torn boot.

Ignoring a clicking axle eventually leads to bearing cage disintegration. If the joint snaps completely while driving, the drive shaft spins freely without delivering power to the wheels, leaving the vehicle stranded. In severe cases, a loose spinning shaft can damage the transmission housing or front suspension arms. Schedule an evaluation promptly, or schedule a test drive or inspection visit with our service team to evaluate your vehicle's road performance safely.

Common Questions About Vehicle Turning Clicks and Drivetrain Repairs

Q: Does a turning click always mean the outer CV joint is failing?

A rhythmic clicking that speeds up with road wheel rotation during sharp turns is caused by a worn outer CV joint in the vast majority of cases. However, loose brake hardware, a bent brake rotor dust shield, or a severely damaged wheel bearing can occasionally mimic rotational noises. A physical underbody inspection confirms whether axle boot tear or joint play is present.

Q: Why does the clicking sound get louder when accelerating through a turn?

Applying throttle transfers engine torque directly through the drive axle while the joint operates at an angle. This added rotational force pushes the internal steel bearing balls harder against worn grooves in the joint cage, accentuating mechanical clearance and making the rhythmic click much sharper and louder.

Q: Can a torn CV boot be replaced without installing a whole new axle?

A boot replacement is feasible only if the damage is caught immediately before grease loss occurs and before grit enters the joint. Once a joint begins making audible clicking or popping sounds, internal wear has scored the metal surfaces, requiring a complete CV axle replacement to restore safety and proper operation.

Q: Will a bad CV joint cause steering wheel vibration?

While an outer joint primarily clicks during turns, a severely worn joint or unbalanced axle shaft can cause noticeable vibration through the steering wheel or floorboards during acceleration. Inner joint failure more frequently causes heavy front-end wobble or shudder during straight-line acceleration.

Q: What happens if a CV axle snaps completely while driving?

If an axle joint fractures completely, engine power can no longer reach that drive wheel. On front-wheel-drive vehicles, the car loses all forward movement. The broken axle shaft can also swing freely, causing secondary damage to nearby brake lines, steering linkages, and transmission seals.

Schedule Drivetrain Inspection and Service

Addressing turning noises early prevents unexpected breakdown situations and protects critical front suspension and steering components from severe secondary damage. Rhythmic clicking or popping during turns indicates that driveline components require expert evaluation by certified technicians who understand factory tolerances and OEM replacement standards.

Our factory-trained service team provides thorough multi-point underbody inspections, precise diagnostic play checks, and high-quality replacement parts tailored to your specific vehicle model. Whether you drive a front-wheel-drive sedan, an all-wheel-drive crossover, or a four-wheel-drive truck, maintaining proper drive axle integrity preserves smooth handling, tire wear, and long-term driving confidence.

If your vehicle is making unusual noises when turning, visit our service center at 1503 Pennsylvania Ave, give our advisors a quick call, or easily schedule a service appointment online today to keep your vehicle operating smoothly and reliably.


© 2026 Tri State Ford. All rights reserved.
Vehicle specification data © JATO Dynamics Limited.

Clicking Noise When Turning in East Liverpool OH | Tri State Ford
Posted in:

Related Posts

f

Why Is Your Car Pulling to One Side?

.hrizn-rte-content .e-rte-image { border: 0;max-width: 100%;height: auto } .hrizn-rte-content .e-rte-image.e-imginline { display: inline-block;float: none;margin-left: 5px;margin-right: 5px;max-width: calc(100% - 10px);vertical-align: bottom } .hrizn-rte-content .e-rte-image.e-imgbreak, .hrizn-rte-content .e-rte-image.e-imgcenter { display: block;float: none;margin: 5px auto;max-width: 100% } .hrizn-rte-content .e-rte-image.e-imgleft { float: left;margin: 0 12px 8px 0;max-width: 100% } .hrizn-rte-content .e-rte-image.e-imgright { float: right;margin: 0 0 8px 12px;max-width: 100% } .hrizn-rte-content figure.e-rte-image { margin: 8px auto;max-width: 100% } .hrizn-rte-content figure.e-imgleft { float: left;margin: 0 12px 8px 0 } .hrizn-rte-content figure.e-imgright { float: right;margin: 0 0 8px 12px } .hrizn-rte-content figure.e-imgcenter { display: block;margin: 8px auto;text-align: center } Uneven tire pressure, improper wheel alignment, uneven tire wear, sticking brake components, or worn suspension parts cause a vehicle to pull to one side while driving. A sudden drop in air pressure on one side increases rolling resistance, while misaligned steering angles actively push the wheels off course. Addressing steering drift quickly protects tire life, restores proper vehicle handling, and prevents uneven wear on critical steering components. When a vehicle's chassis, tires, and steering linkages function correctly, the car tracks straight on a flat, level road with minimal driver intervention. Steering pull occurs when external friction, geometry shifts, or uneven braking forces compel the vehicle to steer away from a straight path. Drivers often feel this as a constant tension in the steering wheel, requiring continuous counter-steering force to keep the vehicle in its lane. Ignoring a persistent drift introduces safety risks and increases long-term repair costs. A vehicle that constantly pulls puts extra strain on ball joints, tie rod ends, and control arm bushings. Ford owner guidelines emphasize that unusual steering behavior, severe drift, or changes in steering feel following an impact require immediate professional evaluation to maintain vehicle safety and directional stability. Drivers seeking professional chassis diagnostics can easily get in touch by placing a call to (330) 462-7578 or getting turn-by-turn routing to our East Liverpool facility. Identifying the underlying cause early preserves tread depth and ensures predictable control during daily travel. Table of Contents What Causes a Vehicle to Pull Side-to-Side While Driving? What Are the Most Common Mechanical Causes of Steering Pull? Why Does Your Vehicle Pull Only When Applying the Brakes? How Can You Tell If You Need a Wheel Alignment Versus a Tire Balance? How Long Does Alignment Service Take and What Are Average Maintenance Costs? Quick Answers to Common Steering Drift Questions How to Diagnose Steering Drift and Schedule Professional Ford Service What Causes a Vehicle to Pull Side-to-Side While Driving? Fluctuating tire pressure, radial tire conicity, and civil road crown design are the primary reasons a vehicle drifts side-to-side during steady cruising. Low pressure in a single front tire reduces its overall effective rolling radius while expanding its contact patch, creating drag that pulls the vehicle toward the underinflated side. Checking cold inflation levels remains the simplest starting point when troubleshooting steering drift. A pressure imbalance as small as 4 PSI between the left and right front tires generates noticeable lateral pull. When local drivers ask us about a slight drift on State Route 170, one of the first things our service team checks is cold tire pressure, as a single underinflated tire often mimics a full alignment issue. Radial tire conicity represents a less obvious cause of steering drift. During tire manufacturing, slight variations in internal belt placement can cause the tire tread to shape itself like a subtle cone. As a conical tire rotates, it exerts continuous lateral force toward its narrower side regardless of alignment settings. Swapping the front tires side-to-side helps isolate tire conicity; if the vehicle begins pulling in the opposite direction after the swap, an internal tire belt issue is confirmed. Civil road design also influences vehicle tracking through intentional slope, known as road crown. Public roads feature a 1% to 2% pitch from the roadway center toward the outer shoulder to prevent standing water accumulation. This gradient naturally encourages a mild drift toward the right lane edge. However, a normal road crown drift requires minimal steering effort to maintain control, whereas a true mechanical pull persists even on flat, level pavement. Maintaining proper tire health and replacing worn rubber with factory-approved tires ensures consistent tracking. Vehicle owners can conveniently maintain their wheel assemblies by ordering genuine OEM parts directly through our service center. What Are the Most Common Mechanical Causes of Steering Pull? Mechanical steering pull stems directly from incorrect wheel alignment geometry or degraded front-end hardware such as worn control arm bushings, tie rod ends, and wheel bearings. When primary alignment angles shift out of factory specification, the tires no longer point straight ahead, forcing constant manual steering correction. Wheel alignment relies on three foundational angles: camber: The inward or outward tilt of the tire when viewed from the front. A vehicle pulls toward the side with more positive camber (tilted outward at the top). A cross-camber difference exceeding 0.5 degrees creates a distinct lateral pull. caster: The forward or backward tilt of the steering axis when viewed from the side. A vehicle pulls toward the side with less positive caster (more vertical axis). toe: The inward or outward direction the tires point relative to the vehicle centerline. Incorrect toe primarily causes severe tread feathering and an off-center steering wheel rather than a continuous lateral drift. Suspension component wear dynamically alters alignment angles while driving. Lower control arm compliance bushings hold front wheels in precise alignment during cornering and acceleration. When rubber bushings crack, tear, or soften, the control arm shifts under load, causing dynamic alignment changes that manifest as unpredictable pulling. Steering linkages and wheel bearings play an equally vital role in directional stability. Loose tie rod ends allow unwanted wheel play, while a failing front wheel bearing generates significant mechanical friction and heat on one corner, creating rolling drag that pulls the chassis toward the affected assembly. Navigating steep riverfront bluffs and uneven valley inclines near East Liverpool places significant load on suspension assemblies, making regular chassis inspections essential for heavy-duty vehicles like the Ford F-150 equipped with its 3.5L engine or the Ford Explorer with its SelectShift® transmission. Why Does Your Vehicle Pull Only When Applying the Brakes? A vehicle that pulls exclusively when pressing the brake pedal indicates uneven hydraulic pressure or mechanical friction between the left and right front brakes. This directional tug happens when one brake caliper clamps with greater force or when a failing component prevents equal pressure release. Hydraulic system failures frequently trigger severe braking pull. A sticking brake caliper piston or seized caliper slide pins prevent equal clamping force across the front axle. If the front passenger-side caliper seizes and fails to engage properly, the driver-side brake does all the stopping work, causing the vehicle to dart abruptly to the left upon braking. Flexible rubber brake hoses can also create sneaky hydraulic issues. Over time, an aging brake hose can collapse internally, acting like a one-way check valve that allows hydraulic fluid pressure to reach the caliper when pressing the pedal but traps fluid pressure when releasing it. This trapped pressure keeps the brake pads in continuous contact with the rotor, generating excessive brake drag, extreme heat, and a persistent pull toward that corner. Uneven friction material condition also contributes to braking pull: Oil, grease, or brake fluid contamination on brake pads reduces friction on one side. Glazed brake rotors reduce pad bite on the affected wheel corner. Severely uneven pad wear between left and right axles causes asymmetrical braking force. Braking pull represents an urgent safety concern because sudden directional shifts during hard stopping maneuvers make lane keeping difficult. Prompt inspection of calipers, slide pins, rubber lines, and pad surfaces restores balanced stopping performance. How Can You Tell If You Need a Wheel Alignment Versus a Tire Balance? You need a wheel alignment if your vehicle continuously drifts or pulls to one side, whereas an out-of-balance tire produces a distinct steering wheel vibration at highway speeds without causing directional pull. Alignment corrects chassis geometry, while tire balancing resolves uneven weight distribution across the rotating wheel assembly. Understanding key symptom differences simplifies accurate troubleshooting: Wheel Alignment Issues: Vehicle continuously drifts or pulls toward the left or right shoulder. Steering wheel sits crooked or off-center while driving straight down a level road. Accelerated wear appears on the inner or outer edges of the tire tread. Vehicle feels loose, wandering across lane lines at highway speeds. Tire Imbalance Issues: Steering wheel shimmies or vibrates noticeably between 55 mph and 70 mph. Seat or floorboard vibration develops at specific vehicle speeds. Scalloped or cupped wear patterns form across the tread surface. Vehicle continues tracking straight despite high-speed steering wheel vibration. Combining regular tire balancing with routine wheel alignment checks preserves driving comfort and extends overall tire tread life. Addressing chassis alignment errors early prevents costly premature tire replacement. How Long Does Alignment Service Take and What Are Average Maintenance Costs? A standard computerized wheel alignment takes between 45 and 60 minutes to perform under normal conditions, provided no steering components are seized or damaged. Comprehensive chassis alignment costs vary based on whether the vehicle requires a two-wheel thrust alignment or a complete four-wheel alignment. During an alignment service, factory-trained technicians execute a rigorous process: Mounting high-precision digital targets to all four wheels. Measuring baseline camber, caster, and toe angles using computerized alignment racks. Inspecting ball joints, tie rods, control arms, and sway bar links for mechanical play. Adjusting tie rod ends, strut mounts, or control arm eccentric bolts to restore factory tolerances. Performing a road test to verify centered steering wheel alignment and straight tracking. If components such as rusted tie rod sleeves or worn ball joints require replacement before alignment adjustments can be made, service time expands accordingly. Staying current on routine chassis checks ensures optimal steering performance for versatile crossovers like the Ford Escape powered by its 1.5L EcoBoost® engine. Vehicle owners can maintain vehicle tracking and system longevity by scheduling a service appointment online or combining chassis maintenance with routine battery service during seasonal visits. Quick Answers to Common Steering Drift Questions Q: Can a bad wheel bearing cause my vehicle to pull to one side? A worn wheel bearing creates excessive mechanical friction and rolling drag on that specific wheel corner, pulling the vehicle toward the side with the damaged bearing assembly. As internal bearing races wear down, wheel looseness develops, altering camber and toe angles while driving. Severe bearing wear also generates a loud grinding or humming noise that grows louder with vehicle speed. Prompt replacement restores smooth rotation and directional control. Q: Why does my vehicle pull to the right even after a complete wheel alignment? When alignment angles fall within factory specification but a pull persists, the cause is typically radial tire conicity or normal road crown. Swapping the front tires side-to-side will confirm if internal tire belt construction is causing the lateral drift. If the pull reverses direction after the tire swap, a tire defect is present. If the pull remains unchanged, checking for dragging brake calipers or worn control arm bushings under load is necessary. Q: Will driving with bad wheel alignment ruin my tires quickly? Operating a vehicle with misaligned wheels rapidly accelerates uneven tread wear, causing tread feathering and premature tire replacement. Incorrect toe angles drag tires sideways across pavement, scrubbing away rubber tread within a few thousand miles. Misaligned camber wears down inner or outer tread shoulders rapidly. Correcting chassis geometry ensures even contact across the entire tire footprint, preserving tread life and fuel economy. Q: Does low power steering fluid cause a directional steering pull? Low power steering fluid typically produces heavy steering feel, whining pump noise, or intermittent power assist, rather than a persistent single-sided pull. Modern electronic power-assisted steering systems automatically adjust assist levels without hydraulic fluid. Directional drift remains rooted in tire pressure differences, alignment errors, dragging brake components, or worn suspension joints. Q: How frequently should I have my vehicle's wheel alignment checked? Alignment should be inspected every 12,000 to 15,000 miles, after installing new tires, or immediately following an impact with a deep pothole or curb. Regular checks catch minor geometry shifts before they ruin tire tread. Inspecting alignment during routine tire rotations ensures balanced tread wear across all four wheels throughout ownership. How to Diagnose Steering Drift and Schedule Professional Ford Service Diagnosing steering pull requires a systematic check starting with cold tire pressure verification, visual inspection of suspension linkages, and professional chassis measurement on a computerized alignment rack. Timely maintenance prevents minor alignment shifts from turning into costly tire replacements or suspension repairs. Our factory-trained technicians utilize specialized alignment equipment engineered specifically for Ford vehicles. Whether your vehicle requires precise sensor calibration, suspension bushing replacement, or brake drag diagnostic testing, our certified service department delivers expert care using genuine OEM components built for long-term durability. Local vehicle owners can easily plan their service visit by visiting our East Liverpool service center or connecting with our service team directly at (330) 462-7578. For added convenience, drivers can also take advantage of our Ford Mobile Service for select routine maintenance procedures performed right at home or work. © 2026 Tri State Ford. All rights reserved. Vehicle specification data © JATO Dynamics Limited. Title Tags Fix Car Pulling Issues in East Liverpool OH | Tri State Ford Meta Description Keywords Open Graph Twitter Card Canonical Article Metadata Geographic Targeting { "@context": "https://schema.org", "@graph": [ { "@type": "NewsArticle", "@id": "#article", "headline": "Why Is Your Car Pulling to One Side?", "datePublished": "2026-09-15T18:07:02.489Z", "dateModified": "2026-09-15T18:09:33.542Z", "author": { "@id": "#author" }, "publisher": { "@id": "#dealer" }, "wordCount": 2133, "description": "A car pulling to one side is typically caused by uneven tire pressure, misaligned wheels, sticking brakes, or worn suspension components." }, { "@type": "AutoDealer", "@id": "#dealer", "name": "Tri State Ford", "url": "https://www.tristateford.net", "telephone": "+13304627578", "sameAs": [ "https://maps.google.com/?cid=1136336406351438323" ], "address": { "@type": "PostalAddress", "streetAddress": "1503 Pennsylvania Ave", "addressLocality": "East Liverpool", "addressRegion": "OH", "postalCode": "43920", "addressCountry": "US" }, "areaServed": { "@type": "GeoCircle", "geoMidpoint": { "@type": "GeoCoordinates", "latitude": "40.6367833", "longitude": "-80.5443033" }, "geoRadius": "48280" }, "geo": { "@type": "GeoCoordinates", "latitude": "40.6367833", "longitude": "-80.5443033" }, "openingHours": [ "Mo 09:00-20:00", "Tu 09:00-18:00", "We 09:00-18:00", "Th 09:00-20:00", "Fr 09:00-18:00", "Sa 09:00-15:00" ] }, { "@type": "FAQPage", "@id": "#faq", "mainEntity": [ { "@type": "Question", "name": "Can a bad wheel bearing cause my vehicle to pull to one side?", "acceptedAnswer": { "@type": "Answer", "text": "A worn wheel bearing creates excessive mechanical friction and rolling drag on that specific wheel corner, pulling the vehicle toward the side with the damaged bearing assembly. As internal bearing races wear down, wheel looseness develops, altering camber and toe angles while driving. Severe bearing wear also generates a loud grinding or humming noise that grows louder with vehicle speed. Prompt replacement restores smooth rotation and directional control." } }, { "@type": "Question", "name": "Why does my vehicle pull to the right even after a complete wheel alignment?", "acceptedAnswer": { "@type": "Answer", "text": "When alignment angles fall within factory specification but a pull persists, the cause is typically radial tire conicity or normal road crown. Swapping the front tires side-to-side will confirm if internal tire belt construction is causing the lateral drift. If the pull reverses direction after the tire swap, a tire defect is present. If the pull remains unchanged, checking for dragging brake calipers or worn control arm bushings under load is necessary." } }, { "@type": "Question", "name": "Will driving with bad wheel alignment ruin my tires quickly?", "acceptedAnswer": { "@type": "Answer", "text": "Operating a vehicle with misaligned wheels rapidly accelerates uneven tread wear, causing tread feathering and premature tire replacement. Incorrect toe angles drag tires sideways across pavement, scrubbing away rubber tread within a few thousand miles. Misaligned camber wears down inner or outer tread shoulders rapidly. Correcting chassis geometry ensures even contact across the entire tire footprint, preserving tread life and fuel economy." } }, { "@type": "Question", "name": "Does low power steering fluid cause a directional steering pull?", "acceptedAnswer": { "@type": "Answer", "text": "Low power steering fluid typically produces heavy steering feel, whining pump noise, or intermittent power assist, rather than a persistent single-sided pull. Modern electronic power-assisted steering systems automatically adjust assist levels without hydraulic fluid. Directional drift remains rooted in tire pressure differences, alignment errors, dragging brake components, or worn suspension joints." } }, { "@type": "Question", "name": "How frequently should I have my vehicle's wheel alignment checked?", "acceptedAnswer": { "@type": "Answer", "text": "Alignment should be inspected every 12,000 to 15,000 miles, after installing new tires, or immediately following an impact with a deep pothole or curb. Regular checks catch minor geometry shifts before they ruin tire tread. Inspecting alignment during routine tire rotations ensures balanced tread wear across all four wheels throughout ownership." } } ] } ] }
f

When Is a Tire Considered Legally Unsafe to Drive On?

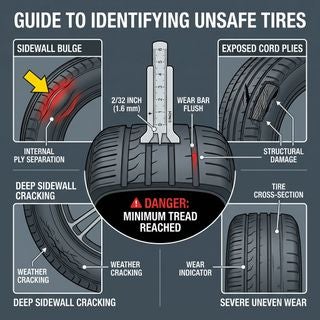
.hrizn-rte-content .e-rte-image { border: 0;max-width: 100%;height: auto } .hrizn-rte-content .e-rte-image.e-imginline { display: inline-block;float: none;margin-left: 5px;margin-right: 5px;max-width: calc(100% - 10px);vertical-align: bottom } .hrizn-rte-content .e-rte-image.e-imgbreak, .hrizn-rte-content .e-rte-image.e-imgcenter { display: block;float: none;margin: 5px auto;max-width: 100% } .hrizn-rte-content .e-rte-image.e-imgleft { float: left;margin: 0 12px 8px 0;max-width: 100% } .hrizn-rte-content .e-rte-image.e-imgright { float: right;margin: 0 0 8px 12px;max-width: 100% } .hrizn-rte-content figure.e-rte-image { margin: 8px auto;max-width: 100% } .hrizn-rte-content figure.e-imgleft { float: left;margin: 0 12px 8px 0 } .hrizn-rte-content figure.e-imgright { float: right;margin: 0 0 8px 12px } .hrizn-rte-content figure.e-imgcenter { display: block;margin: 8px auto;text-align: center } A passenger vehicle tire is legally unsafe to drive on when its tread depth wears down to 2/32 inch (approximately 1.6 mm), when built-in wear indicator bars become flush with the tread surface, or when structural damage such as sidewall cracks exceeding 1.5 mm deep, exposed internal cords, bulges, or tread separation appear. In Ohio, driving on tires below the legal minimum tread limit compromises wet-weather stopping distance and elevates the risk of hydroplaning, necessitating immediate replacement to maintain vehicle control and road safety. Maintaining proper tire health is essential for protecting your vehicle and everyone inside it. Tire tread serves a mechanical purpose: it evacuates water from beneath the rubber contact patch so your vehicle can steer and stop effectively. When tread rubber wears down past safe thresholds, traction drops sharply on wet asphalt and slush, causing stopping distances to increase dramatically even at moderate road speeds. Beyond tread depth, a tire becomes unsafe whenever its structural casing is compromised. Internal belting and rubber compounds break down over time due to age, heat cycles, UV exposure, and impact stress from road hazards. Physical deformities like bubbles on the sidewall indicate that internal structural plies have ruptured, allowing high-pressure air to push against the outer rubber layer. Continuing to drive on a tire with internal plies damaged like this risks a sudden highway blowout. Regular multi-point safety inspections help spot these compromised conditions before they cause a breakdown on the road. Drivers can visit our dealership location at 1503 Pennsylvania Ave for a thorough tire safety check, give our team a quick call to discuss any unusual tire symptoms, or schedule a test drive in a new vehicle equipped with the latest safety technologies. Table of Contents At What Tread Depth Must You Replace Passenger Vehicle Tires? How Do Formal Inspection Standards Define Unsafe Wear Patterns and Commercial Thresholds? How Deep Must Sidewall Cracks from Dry Rot Be Before Mandatory Replacement? What Are the 7 Critical Warning Signs That You Need New Tires Right Away? Common Questions About Tire Safety, Wear Patterns, and Replacement Limits Schedule Certified Tire Care and Safety Inspections At What Tread Depth Must You Replace Passenger Vehicle Tires? Passenger vehicle tires reach their mandatory replacement limit at 2/32 inch of remaining tread depth, though automotive safety standards strongly recommend replacing all-season tires once tread wears down to 4/32 inch for adequate wet-weather braking and hydroplane resistance. Once tread depth drops below 4/32 inch, a tire loses up to three-quarters of its capacity to channel water away from the contact patch, significantly increasing stopping distances during heavy rainfall. | Tread Depth | Safety Condition | Driver Action Required | | --- | --- | --- | | 6/32 inch or more | Good Condition | Routine maintenance and regular rotations | | 4/32 inch | Recommended Limit | Plan for replacement; wet grip decreases | | 2/32 inch | Mandatory Replacement | Immediate replacement required by law | Checking your tread depth at home takes less than a minute and requires only simple tools. The traditional coin check offers a fast visual reference: insert a standard U.S. penny upside down into the main tread groove with Abraham Lincoln's head facing you. If the top of Lincoln's head remains completely visible above the rubber block, your tread depth has reached or fallen below the legal minimum threshold of 2/32 inch, and the tire must be replaced immediately. For a clearer picture of seasonal performance, perform a quarter check. Placing a quarter upside down into the groove measures depth against George Washington's head, which sits at roughly 4/32 inch from the coin edge. If the top of Washington's head is visible, the tire has reached the point where wet traction and snow gripping power decline noticeably. Measuring multiple spots across the tire surface is critical because alignment issues or improper inflation often cause uneven rubber loss. Check the inner groove, center groove, and outer edge groove on every tire. If any single groove reads 2/32 inch or lower, that tire is legally worn out regardless of how much rubber remains on the rest of the surface. Driver assist features like pre-collision assist with automatic emergency braking rely on solid tire traction to slow your vehicle effectively in emergencies. Our tire center makes finding the correct factory-fit replacement straightforward. You can easily order tires matched by vehicle year, make, and model through our online portal, or view our current manufacturer vehicle specials for service offers on complete tire sets. How Do Formal Inspection Standards Define Unsafe Wear Patterns and Commercial Thresholds? Formal motor vehicle inspection standards define a tire as unsafe when molded wear indicator bars sit level with adjacent tread blocks, when wear is uneven across the tread face, or when tread on heavy vehicles weighing over 10,000 pounds falls below 4/32 inch on steering axles. State inspection codes and federal safety guidelines require tires to maintain uniform tread coverage across all major grooves to ensure vehicle stability and predictable tracking. Uneven tread wear patterns signal specific underlying mechanical or maintenance issues that compromise safety: Shoulder Wear on Both Edges: Heavy rubber loss on both outer shoulders indicates chronic under-inflation, which causes the tire center to collapse inward and forces the outer edges to bear excessive vehicle weight. Center Tread Wear: Concentrated wear along the center rib indicates over-inflation, reducing the contact patch size and causing harsh ride quality along with accelerated center tire wear. Single-Edge Wear: Pronounced wear along only the inner or outer edge points to wheel misalignment, camber errors, or worn steering linkages that pull the tire sideways as it rolls. Cupping or Scalloping: High-and-low diagonal dips across the tread surface indicate worn shock absorbers, out-of-balance wheel assemblies, or damaged suspension bushings allowing the wheel to bounce down the road. Safety standards enforce stricter tread thresholds for heavier vehicles due to the immense kinetic energy and stopping distance required for large trucks and towing rigs. While passenger cars share a mandatory minimum floor of 2/32 inch, vehicles with a gross vehicle weight rating exceeding 10,000 pounds must maintain at least 4/32 inch of tread depth on front steering axle tires. Commercial standards also mandate that any tire with two adjacent tread grooves measuring below 2/32 inch, or any tire showing internal fabric, steel belts, or ply separation, must be removed from service immediately. Commuters navigating the rolling hills and highway stretches around Calcutta encounter varying pavement textures and seasonal weather that accelerate uneven wear if tire maintenance is neglected. Regular rotations every 5,000 to 8,000 miles distribute steering and driving forces evenly across all four positions, extending total tread life and keeping wear patterns uniform. How Deep Must Sidewall Cracks from Dry Rot Be Before Mandatory Replacement? Sidewall cracks caused by dry rot require immediate tire replacement when they reach 1.5 mm (approximately 1/16 inch) in depth, when internal structural cords become visible, or when deep fissures open anywhere along the sidewall face. Even if a tire retains substantial tread height, rubber compound oxidation causes structural brittleness that can result in sudden tread separation or sidewall blowouts at highway speeds. Rubber degradation is a chemical process triggered by atmospheric ozone, ultraviolet light, heat cycles, and extended vehicle inactivity. Tire manufacturers blend protective waxes and anti-ozonant compounds into the rubber to maintain elasticity. When a vehicle is driven regularly, the mechanical flexing of the rotating wheel pushes these protective waxes to the surface. When a vehicle sits parked for long periods, this continuous replenishment stops, allowing UV rays and environmental oxygen to break down polymer chains inside the rubber matrix. A simple thumb flex check helps evaluate whether sidewall cracking is cosmetic checking or deep structural failure: Clean and Inspect: Wipe dirt and grime off the tire sidewall near the rim flange and raised lettering where micro-cracking usually begins. Apply Pressure: Press your thumb firmly against the rubber directly beside the crack to flex the sidewall surface. Observe Fissure Behavior: If the crack remains shallow and closed under pressure, it is superficial surface checking. If the crack opens up to reveal lighter inner rubber, nylon cords, or steel wire, the tire structure is compromised. The presence of full tread depth can create a dangerous false sense of security on older tires. Low-mileage vehicles, seasonal trailers, and secondary commuter cars often show deep tread blocks while the underlying carcass has dry rotted into a brittle state. Chemical tire dressings containing heavy petroleum distillates or harsh silicone solvents accelerate this dry rot process by stripping away the factory anti-ozonant barrier. Cleaning tires with mild soap and water is the safest way to preserve sidewall elasticity. When replacement components or specialized tire equipment are needed, drivers can order genuine OEM parts directly through our service portal to ensure exact fitment and factory safety standards. What Are the 7 Critical Warning Signs That You Need New Tires Right Away? Drivers should inspect their tires monthly for seven clear indicators that signal a tire has reached the end of its safe operational life and requires replacement: 1. Tread Depth Below 2/32 Inch: Rubber worn down to or past the legal 2/32 inch limit cannot evacuate water or slush, creating severe hydroplaning hazards. 2. Flush Tread Wear Indicators: Molded rubber bars running across the bottom of the tread grooves sit level with surrounding tread blocks when the tire is fully worn out. 3. Deep Sidewall Cracking or Dry Rot: Cracks reaching 1.5 mm deep or showing internal structural cords reveal severe chemical degradation of the rubber matrix. 4. Sidewall Bulges, Bubbles, or Blisters: A localized bulge on the outer sidewall indicates that the internal structural plies have ruptured, allowing air pressure to push out the surface rubber. 5. Persistent Air Pressure Loss: A tire that consistently loses pressure or triggers the tire pressure monitoring system (TPMS) warning light without an obvious nail puncture often suffers from bead leaks or internal liner porosity. 6. Excessive Steering Wheel Vibration or Vehicle Pulling: Unexplained shaking through the steering wheel or seat that persists after wheel balancing suggests internal belt separation or structural casing distortion. 7. Severe Irregular Wear Patterns: Deep cupping, diagonal scuffing, or severe inner-edge wear exposes internal plies and drastically reduces tire traction. Drivers taking daily trips through Boardman often experience persistent steering wheel vibration when internal tire belts begin shifting under load. Physical damage like sidewall bulges from impact with deep potholes requires immediate attention, as a bulged tire can burst without warning under normal road stresses. If a blowout occurs while driving, avoid slamming on the brakes. Keep both hands firmly on the steering wheel, maintain momentum for a brief second to stabilize vehicle trajectory, ease off the accelerator gradually, and guide the vehicle safely onto the road shoulder. For roadside emergencies, drivers can access manufacturer-backed assistance directly through Ford Roadside Assistance: 1-800-241-3673 for flat tire changes and towing support. Common Questions About Tire Safety, Wear Patterns, and Replacement Limits Q: At what specific tread depth are passenger tires legally considered unsafe and due for mandatory replacement, even if they still look usable? Studies show that nearly 30% of tire-related accidents involve tires worn below the legal tread depth limit of 2/32 inch (about 1.6 mm). At this depth, the built-in wear indicator bars molded into the tread grooves become flush with the outer tread face. While a tire with 2/32 inch of tread may appear visually intact from a distance, its ability to channel water on wet pavement is compromised, leading to increased stopping distances and severe hydroplaning risks. Q: How do formal inspection and safety standards define unsafe tread wear patterns, including thresholds for heavier vehicles, beyond simple visual checks? Formal inspection standards classify a tire as unsafe if any tread wear indicator bar touches the road surface, if tread wear is uneven across the tread face, or if internal steel belts or fabric cords are exposed. For vehicles weighing over 10,000 pounds, safety standards mandate a minimum tread depth of 4/32 inch on front steering axles to maintain control under high load conditions. Uneven wear patterns like cupping, shoulder wear, or single-edge wear indicate alignment, inflation, or suspension failures that require immediate correction. Q: How deep do sidewall cracks from dry rot need to be before a tire must be replaced immediately, even if the tread depth is still above the legal minimum? Sidewall cracks from dry rot dictate immediate tire replacement when they reach 1.5 mm (roughly 1/16 inch) in depth, open up under manual pressure to reveal inner lighter rubber, or expose underlying structural cords. Deep dry rot cracks mean volatile oils inside the rubber compound have evaporated, leaving the tire brittle and susceptible to catastrophic sidewall blowouts regardless of how much remaining tread depth is present. Q: How does the DOT date code on a tire sidewall indicate when a tire is expired? The DOT date code is a four-digit number stamped on the tire sidewall that represents the week and year of manufacture. For example, a code reading 3121 indicates the tire was produced during the 31st week of 2021. Major safety guidelines recommend having tires inspected annually after 5 years in service and replacing any tire once it reaches 6 to 10 years of age from its manufacture date, as internal rubber compounds degrade over time even when stored or driven infrequently. Q: What action should a driver take if a tire experiences a sudden blowout at highway speeds? If a tire suffers a sudden blowout, hold the steering wheel firmly with both hands to maintain control and resist the urge to slam on the brakes. Maintain light pressure on the accelerator for a brief moment to stabilize the vehicle's momentum, then ease off the gas pedal gradually while steering straight. Once the vehicle slows down and stabilizes, signal gently and guide the car onto a safe, flat surface off the roadway before applying the brakes. Schedule Certified Tire Care and Safety Inspections Regular tire care and timely replacements are essential for maintaining your vehicle's safety, fuel economy, and handling stability. Driving on worn tread, dry-rotted sidewalls, or damaged internal belts puts your safety at risk, especially during severe weather conditions. Professional tire inspections identify subtle wear patterns, improper inflation, and structural defects long before they lead to roadside breakdowns. Our factory-trained technicians provide comprehensive tire health checks, wheel alignments, precision balancing, and tread depth assessments using specialized diagnostic equipment. Whether you need a simple rotation or a complete set of new factory-recommended tires, our team ensures your vehicle leaves our service bay operating at peak safety standards. Taking care of your tires is easy and convenient with our online booking tools. You can get directions to our service center, give our service desk a quick call to ask about current tire availability, or schedule a service appointment online to keep your vehicle running safely on every trip. © 2026 Tri State Ford. All rights reserved. Title Tags Tire Safety & Legal Limits in East Liverpool OH | Tri State Ford Meta Description Keywords Open Graph Twitter Card Canonical Article Metadata Geographic Targeting { "@context": "https://schema.org", "@graph": [ { "@type": "NewsArticle", "@id": "#article", "headline": "When Is a Tire Considered Legally Unsafe to Drive On?", "datePublished": "2026-09-14T16:17:29.491Z", "dateModified": "2026-09-14T16:19:09.693Z", "author": { "@id": "#author" }, "publisher": { "@id": "#dealer" }, "wordCount": 2513, "description": "Tires are legally unsafe to drive on when tread depth drops to 2/32 inch or structural damage occurs, increasing the risk of hydroplaning and blowouts." }, { "@type": "AutoDealer", "@id": "#dealer", "name": "Tri State Ford", "url": "https://www.tristateford.net", "telephone": "+13304627578", "sameAs": [ "https://maps.google.com/?cid=1136336406351438323" ], "address": { "@type": "PostalAddress", "streetAddress": "1503 Pennsylvania Ave", "addressLocality": "East Liverpool", "addressRegion": "OH", "postalCode": "43920", "addressCountry": "US" }, "areaServed": { "@type": "GeoCircle", "geoMidpoint": { "@type": "GeoCoordinates", "latitude": "40.6367833", "longitude": "-80.5443033" }, "geoRadius": "48280" }, "geo": { "@type": "GeoCoordinates", "latitude": "40.6367833", "longitude": "-80.5443033" }, "openingHours": [ "Mo 09:00-20:00", "Tu 09:00-18:00", "We 09:00-18:00", "Th 09:00-20:00", "Fr 09:00-18:00", "Sa 09:00-15:00" ] }, { "@type": "FAQPage", "@id": "#faq", "mainEntity": [ { "@type": "Question", "name": "At what specific tread depth are passenger tires legally considered unsafe and due for mandatory replacement, even if they still look usable?", "acceptedAnswer": { "@type": "Answer", "text": "Studies show that nearly 30% of tire-related accidents involve tires worn below the legal tread depth limit of 2/32 inch (about 1.6 mm). At this depth, the built-in wear indicator bars molded into the tread grooves become flush with the outer tread face. While a tire with 2/32 inch of tread may appear visually intact from a distance, its ability to channel water on wet pavement is compromised, leading to increased stopping distances and severe hydroplaning risks." } }, { "@type": "Question", "name": "How do formal inspection and safety standards define unsafe tread wear patterns, including thresholds for heavier vehicles, beyond simple visual checks?", "acceptedAnswer": { "@type": "Answer", "text": "Formal inspection standards classify a tire as unsafe if any tread wear indicator bar touches the road surface, if tread wear is uneven across the tread face, or if internal steel belts or fabric cords are exposed. For vehicles weighing over 10,000 pounds, safety standards mandate a minimum tread depth of 4/32 inch on front steering axles to maintain control under high load conditions. Uneven wear patterns like cupping, shoulder wear, or single-edge wear indicate alignment, inflation, or suspension failures that require immediate correction." } }, { "@type": "Question", "name": "How deep do sidewall cracks from dry rot need to be before a tire must be replaced immediately, even if the tread depth is still above the legal minimum?", "acceptedAnswer": { "@type": "Answer", "text": "Sidewall cracks from dry rot dictate immediate tire replacement when they reach 1.5 mm (roughly 1/16 inch ) in depth, open up under manual pressure to reveal inner lighter rubber, or expose underlying structural cords. Deep dry rot cracks mean volatile oils inside the rubber compound have evaporated, leaving the tire brittle and susceptible to catastrophic sidewall blowouts regardless of how much remaining tread depth is present." } }, { "@type": "Question", "name": "How does the DOT date code on a tire sidewall indicate when a tire is expired?", "acceptedAnswer": { "@type": "Answer", "text": "The DOT date code is a four-digit number stamped on the tire sidewall that represents the week and year of manufacture. For example, a code reading 3121 indicates the tire was produced during the 31st week of 2021. Major safety guidelines recommend having tires inspected annually after 5 years in service and replacing any tire once it reaches 6 to 10 years of age from its manufacture date, as internal rubber compounds degrade over time even when stored or driven infrequently." } }, { "@type": "Question", "name": "What action should a driver take if a tire experiences a sudden blowout at highway speeds?", "acceptedAnswer": { "@type": "Answer", "text": "If a tire suffers a sudden blowout, hold the steering wheel firmly with both hands to maintain control and resist the urge to slam on the brakes. Maintain light pressure on the accelerator for a brief moment to stabilize the vehicle's momentum, then ease off the gas pedal gradually while steering straight. Once the vehicle slows down and stabilizes, signal gently and guide the car onto a safe, flat surface off the roadway before applying the brakes." } } ] } ] }

f

What Does a Flashing Check Engine Light Mean? Insights from Our Service Manager

.hrizn-rte-content .e-rte-image{border:0;max-width:100%;height:auto} .hrizn-rte-content .e-rte-image.e-imginline{display:inline-block;float:none;margin-left:5px;margin-right:5px;max-width:calc(100% - 10px);vertical-align:bottom} .hrizn-rte-content .e-rte-image.e-imgbreak,.hrizn-rte-content .e-rte-image.e-imgcenter{display:block;float:none;margin:5px auto;max-width:100%} .hrizn-rte-content .e-rte-image.e-imgleft{float:left;margin:0 12px 8px 0;max-width:100%} .hrizn-rte-content .e-rte-image.e-imgright{float:right;margin:0 0 8px 12px;max-width:100%} .hrizn-rte-content figure.e-rte-image{margin:8px auto;max-width:100%} .hrizn-rte-content figure.e-imgleft{float:left;margin:0 12px 8px 0} .hrizn-rte-content figure.e-imgright{float:right;margin:0 0 8px 12px} .hrizn-rte-content figure.e-imgcenter{display:block;margin:8px auto;text-align:center} What Does a Flashing Check Engine Light Mean? Insights from Our Service Manager What Does a Flashing Check Engine Light Indicate? A flashing check engine light indicates an active, severe engine misfire occurring right now, allowing unburned fuel to dump directly into your exhaust system. Under SAE J2012 and OBD-II standards, the engine computer blinks the warning lamp when misfire rates reach a threshold high enough to overheat and permanently destroy the catalytic converter within minutes. As the Service Manager at Tri State Ford with a decade of hands-on experience in automotive diagnostics, I see drivers face this issue every month. When your dashboard malfunction indicator lamp flashes rather than staying solid, your vehicle is signaling an immediate mechanical emergency. The computer has detected that one or more cylinders are not firing correctly, which sends raw gasoline down the exhaust stream. When that fuel reaches the extremely hot catalytic converter, it ignites inside the exhaust housing rather than inside the combustion chamber. This secondary combustion rapidly elevates catalytic converter temperatures well past normal operating limits. In severe cases, the internal ceramic honeycombs melt or disintegrate, turning what could have been a straightforward ignition fix into a costly catalytic converter replacement. Drivers navigating the riverfront bluffs and rising terrain around East Liverpool should take this warning seriously, as pulling heavy loads up hills with an active misfire accelerates exhaust system damage. If your light starts blinking while you are on the road, give our team a call at (330) 462-7578 to discuss immediate vehicle care, or find directions to our service center location to bring your vehicle in safely via flatbed tow. Table of Contents Is a Steady Check Engine Light Different From a Flashing Warning? What Causes the Engine Misfire Behind a Flashing Engine Light? Is It Safe to Drive a Short Distance With a Flashing Check Engine Light? How Does an OBD-II Scanner Diagnose Misfire Diagnostic Trouble Codes? How Much Do Professional OBD-II Diagnostic Scans and Repairs Cost? Is a Steady Check Engine Light Different From a Flashing Warning? A steady check engine light signals a non-critical emissions or engine performance fault that requires attention but generally allows you to complete your trip safely. Conversely, a flashing check engine light signifies an ongoing misfire that actively damages vital engine and exhaust hardware every second the vehicle runs. When the warning light remains solid, the onboard computer has logged a diagnostic code for a system operating outside normal tolerances. Common triggers for a steady light include a loose gas cap, a failing oxygen sensor, or a minor leak in the evaporative emissions system. While a steady light should be diagnosed promptly to preserve fuel efficiency and overall engine health, it rarely leaves you stranded on the shoulder or causes sudden catalyst failure. In many instances, the computer initiates a limited operation mode to protect mechanical parts while permitting short-distance driving. A flashing warning light leaves zero room for delay. The constant pulsing pattern—typically blinking once per second—is specifically reserved for conditions that threaten catastrophic hardware breakdown. When drivers ask our service bay about warning lights, I explain that a steady light gives you time to plan a routine diagnostic visit, whereas a flashing light requires shutting off the ignition as soon as you pull into a safe location. Addressing steady lights early by ordering genuine OEM parts like replacement gas caps or sensors helps prevent minor sensor wear from turning into bigger drivability trouble later. What Causes the Engine Misfire Behind a Flashing Engine Light? An engine misfire triggering a flashing check engine light is caused by an interruption in the air, fuel, or spark required for proper cylinder combustion. The primary culprits are worn spark plugs, failed ignition coils, faulty fuel injectors, or a loss of mechanical cylinder compression. In modern engines like the Ford 2.3L EcoBoost inline-four or the 5.0L V8, combustion relies on precise timing. If an ignition coil pack fails or a spark plug gap expands due to wear, the electrical arc fails to ignite the air-fuel mixture inside the cylinder. The unfired fuel mixture is pushed past the exhaust valve during the exhaust stroke. The same outcome occurs when a fuel injector sticks open, flooding the cylinder with excessive fuel, or when a vacuum leak starves a cylinder of proper atmospheric pressure. Worn or fouled spark plugs that fail to produce a strong electrical spark Failed coil-on-plug ignition units that stop delivering high voltage Clogged, leaking, or stuck-open fuel injectors disrupting the fuel charge Mechanical compression loss from burnt valves, damaged piston rings, or head gasket leaks Intake vacuum leaks causing an extreme lean misfire on specific cylinders When raw fuel reaches the exhaust manifold, temperatures can exceed 1,600 degrees Fahrenheit inside the exhaust piping. That thermal spike breaks down the precious metals within the catalyst core. Identifying whether the misfire stems from electrical, fuel delivery, or mechanical causes requires methodical shop testing. Is It Safe to Drive a Short Distance With a Flashing Check Engine Light? Driving even a short distance with a flashing check engine light is unsafe because unburned fuel entering the exhaust manifold can melt the internal structure of your catalytic converter within two to three miles. To prevent compounding repair bills, you should pull over safely, turn off the engine, and arrange emergency vehicle transport. Continuing to drive under heavy engine load or at highway speeds while the light blinks magnifies the mechanical strain. Drivers commuting along Route 170 near Calcutta often experience noticeable engine shaking, sluggish acceleration, or severe power loss when a misfire occurs. Operating a misfiring engine under load causes raw fuel to continuously wash down cylinder walls, diluting protective engine oil and increasing internal friction on crankshaft bearings and cylinder liners. If your dashboard light flashes while driving, reduce your speed immediately, avoid hard acceleration, and find a safe spot off the roadway. For Ford owners, safety coverage includes access to official Ford Roadside Assistance at (800) 241-3673, which provides specialized towing to authorized facilities where factory-trained technicians handle complex powertrain repairs. While our service technicians inspect and repair your vehicle in the bay, customers interested in exploring our current vehicle lineup can consider scheduling a test drive in a new model to experience the latest Ford safety features firsthand. How Does an OBD-II Scanner Diagnose Misfire Diagnostic Trouble Codes? An OBD-II scanner diagnoses a flashing check engine light by plugging directly into the vehicle diagnostic port to retrieve stored numerical trouble codes from the engine control module. These diagnostic codes pinpoint whether misfires are isolated to a single cylinder or spread across multiple combustion chambers. When an engine misfire occurs, the vehicle computer logs specific diagnostic trouble codes categorized as active, pending, or stored. Active codes reflect severe, recurring faults that trigger immediate warning lights, whereas pending codes represent initial detection events awaiting confirmation across secondary drive cycles. Stored codes preserve historical diagnostic information for technician reference. P0300: Indicates a random or multiple cylinder misfire where the computer cannot isolate the issue to a single cylinder P0301 through P0308: Identifies a specific cylinder experiencing a misfire, with the final digit matching the affected cylinder number P0316: Signals that an engine misfire was detected during the first 1,000 engine revolutions after startup While an entry-level handheld scanner identifies the numerical code, professional diagnostic equipment goes much deeper. Advanced tools run live power balance tests, monitor real-time oxygen sensor waveforms, and track fuel trim percentages. This comprehensive data allows a technician to distinguish between an electrical coil breakdown, a clogged fuel injector, or a mechanical valve fault before replacing any components. How Much Do Professional OBD-II Diagnostic Scans and Repairs Cost? A professional OBD-II diagnostic scan typically ranges from $80 to $150, which covers hands-on technician evaluation, electrical pin-point testing, and computerized system analysis. Total repair expenses depend on the underlying cause, ranging from minor ignition parts to extensive catalytic converter replacement. Reading the initial trouble code is only the first step in proper auto service. The diagnostic fee pays for an experienced technician to verify sensor values, check system wiring, conduct smoke tests for vacuum leaks, and perform compression checks. Replacing a single spark plug or ignition coil pack is relatively inexpensive, whereas replacing a damaged catalytic converter ruined by prolonged driving with a flashing light can push repair bills significantly higher. Repair Service Typical Cost Factors Primary Benefit Diagnostic Evaluation Professional technician labor, scanner hookup, pinpoint testing Identifies accurate root cause without guessing Spark Plug & Coil Replacement Number of cylinders, engine access, genuine OEM parts Restores clean ignition spark and engine power Fuel Injector Service Injector cleaning, solenoid testing, unit replacement Ensures correct air-fuel mixture in combustion chamber Catalytic Converter Replacement Direct-fit exhaust assembly, manifold labor, oxygen sensors Restores exhaust flow and vehicle emissions compliance Taking prompt action when your warning light flashes preserves your engine, protects your exhaust hardware, and keeps long-term maintenance costs manageable. If you suspect an engine misfire or need an accurate vehicle diagnostic check, feel free to give our team a quick call, stop by our East Liverpool service center, or secure your spot by scheduling your service appointment online today. © 2026 Tri State Ford. All rights reserved. Title Tags Flashing Check Engine Light Repair in East Liverpool OH | Tri State Ford Meta Description Keywords Open Graph Twitter Card Canonical Article Metadata Geographic Targeting { "@context": "https://schema.org", "@graph": [ { "@type": "NewsArticle", "@id": "#article", "headline": "What Does a Flashing Check Engine Light Mean? Insights from Our Service Manager", "datePublished": "2026-09-11T18:52:41.462Z", "dateModified": "2026-09-11T18:54:12.374Z", "author": { "@id": "#author" }, "publisher": { "@id": "#dealer" }, "wordCount": 1570, "description": "A flashing check engine light indicates a severe engine misfire that can quickly destroy your catalytic converter. Learn what causes this emergency warning." }, { "@type": "AutoDealer", "@id": "#dealer", "name": "Tri State Ford", "url": "https://www.tristateford.net", "telephone": "+13304627578", "sameAs": [ "https://maps.google.com/?cid=1136336406351438323" ], "address": { "@type": "PostalAddress", "streetAddress": "1503 Pennsylvania Ave", "addressLocality": "East Liverpool", "addressRegion": "OH", "postalCode": "43920", "addressCountry": "US" }, "areaServed": { "@type": "GeoCircle", "geoMidpoint": { "@type": "GeoCoordinates", "latitude": "40.6367833", "longitude": "-80.5443033" }, "geoRadius": "48280" }, "geo": { "@type": "GeoCoordinates", "latitude": "40.6367833", "longitude": "-80.5443033" }, "openingHours": [ "Mo 09:00-20:00", "Tu 09:00-18:00", "We 09:00-18:00", "Th 09:00-20:00", "Fr 09:00-18:00", "Sa 09:00-15:00" ] }, { "@type": "FAQPage", "@id": "#faq", "mainEntity": [ { "@type": "Question", "name": "What Does a Flashing Check Engine Light Indicate?", "acceptedAnswer": { "@type": "Answer", "text": "A flashing check engine light indicates an active, severe engine misfire occurring right now, allowing unburned fuel to dump directly into your exhaust system. Under SAE J2012 and OBD-II standards, the engine computer blinks the warning lamp when misfire rates reach a threshold high enough to overheat and permanently destroy the catalytic converter within minutes." } }, { "@type": "Question", "name": "Is a Steady Check Engine Light Different From a Flashing Warning?", "acceptedAnswer": { "@type": "Answer", "text": "A steady check engine light signals a non-critical emissions or engine performance fault that requires attention but generally allows you to complete your trip safely. Conversely, a flashing check engine light signifies an ongoing misfire that actively damages vital engine and exhaust hardware every second the vehicle runs." } }, { "@type": "Question", "name": "What Causes the Engine Misfire Behind a Flashing Engine Light?", "acceptedAnswer": { "@type": "Answer", "text": "An engine misfire triggering a flashing check engine light is caused by an interruption in the air, fuel, or spark required for proper cylinder combustion. The primary culprits are worn spark plugs, failed ignition coils, faulty fuel injectors, or a loss of mechanical cylinder compression." } }, { "@type": "Question", "name": "Is It Safe to Drive a Short Distance With a Flashing Check Engine Light?", "acceptedAnswer": { "@type": "Answer", "text": "Driving even a short distance with a flashing check engine light is unsafe because unburned fuel entering the exhaust manifold can melt the internal structure of your catalytic converter within two to three miles. To prevent compounding repair bills, you should pull over safely, turn off the engine, and arrange emergency vehicle transport." } }, { "@type": "Question", "name": "How Does an OBD-II Scanner Diagnose Misfire Diagnostic Trouble Codes?", "acceptedAnswer": { "@type": "Answer", "text": "An OBD-II scanner diagnoses a flashing check engine light by plugging directly into the vehicle diagnostic port to retrieve stored numerical trouble codes from the engine control module. These diagnostic codes pinpoint whether misfires are isolated to a single cylinder or spread across multiple combustion chambers." } }, { "@type": "Question", "name": "How Much Do Professional OBD-II Diagnostic Scans and Repairs Cost?", "acceptedAnswer": { "@type": "Answer", "text": "A professional OBD-II diagnostic scan typically ranges from $80 to $150, which covers hands-on technician evaluation, electrical pin-point testing, and computerized system analysis. Total repair expenses depend on the underlying cause, ranging from minor ignition parts to extensive catalytic converter replacement." } } ] } ] }